
This tutorial walks you through Pense-bête step by step: writing a note, turning it into a checklist, placing it below the notch or anywhere else, choosing its colors and working from the keyboard. Each chapter shows where to click, most of them with a screenshot or a short video.
- Mac, macOS 14 or later
- 16 chapters
- 3 videos
- Pense-bête 1.0, October 2026
The screenshots show made-up notes: “Meeting at 2 pm, room B”, “Call Emma”, a shopping list… The views of the top of the screen and of the whole screen are reconstructions: each note is drawn by Pense-bête itself, at the position it calculates, on a neutral background. The videos, silent and sped up, are reconstructed the same way, pointer included. The menus and windows are the app's own.
Contents (16 chapters)
Before you start
Pense-bête keeps what you mustn't forget right in front of you: a reminder, a name, the task at hand. Its notes float above your windows, below the MacBook's notch or wherever you put them, on every desktop.
What you need
- A Mac running macOS 14 Sonoma or later, with or without a notch. On a display without a notch, the “below the notch” position is at the top center, just under the menu bar.
- Nothing else: no account to create, no privacy permission to grant (neither Accessibility nor screen recording), no in-app purchase.
Pense-bête never connects to the internet: your notes stay on this Mac (see Your notes and their file). It speaks English, French, Spanish and German, and follows the language of macOS.
Where is Pense-bête?
Pense-bête lives in the menu bar, at the top right of the screen: it has no icon in the Dock. Its icon is a small note: lined when at least one note is showing, blank when they are all hidden or there are none. Click it to open its menu (see The Pense-bête menu).
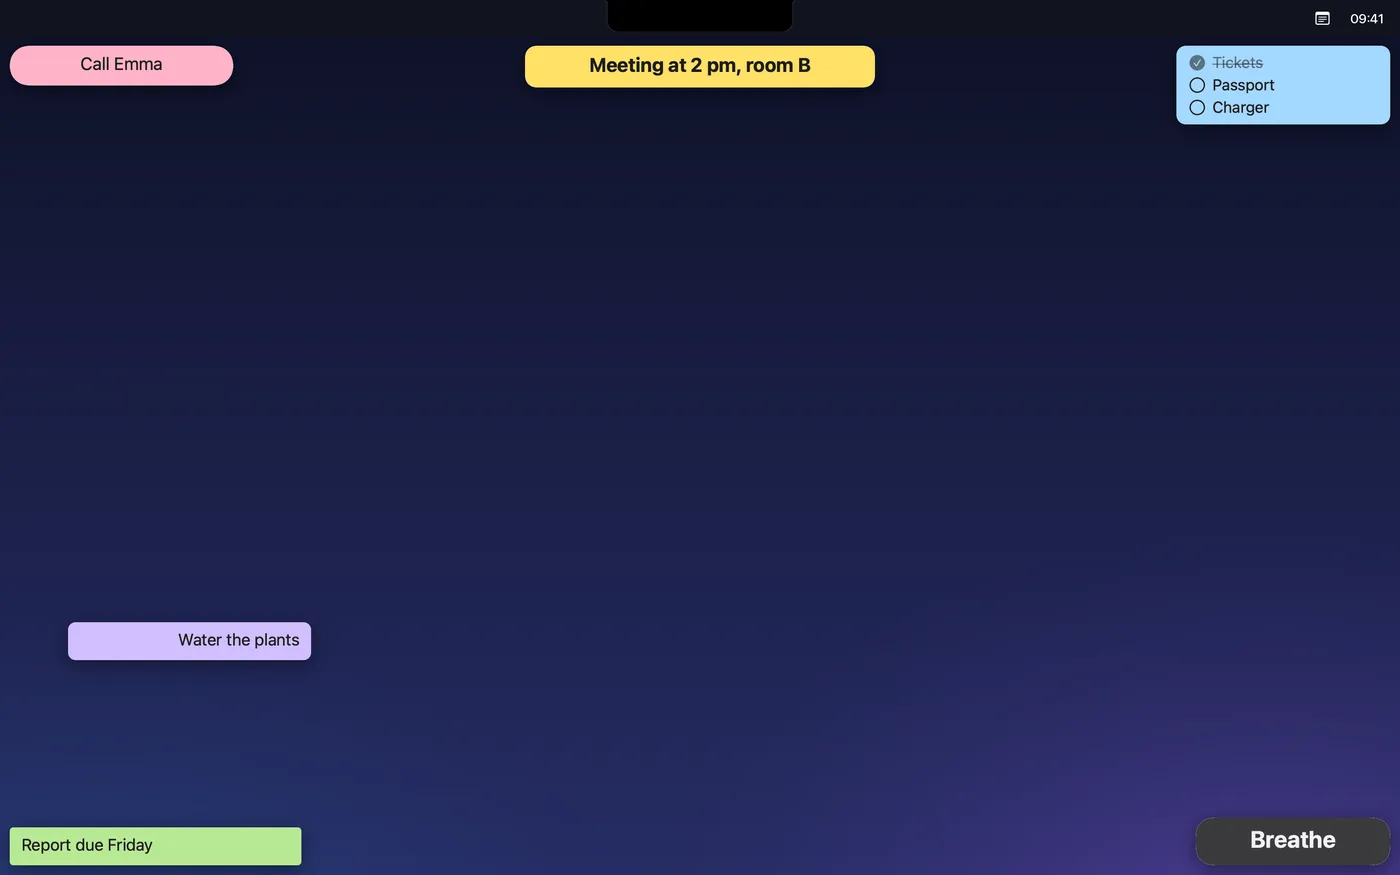
On a MacBook with a notch, a crowded menu bar can hide icons behind the notch. If the Pense-bête icon doesn't appear while the app is running, open it again from the Applications folder or Spotlight: its Settings window opens, and everything can be adjusted there. Fewer icons in the menu bar also leaves it room.
First launch
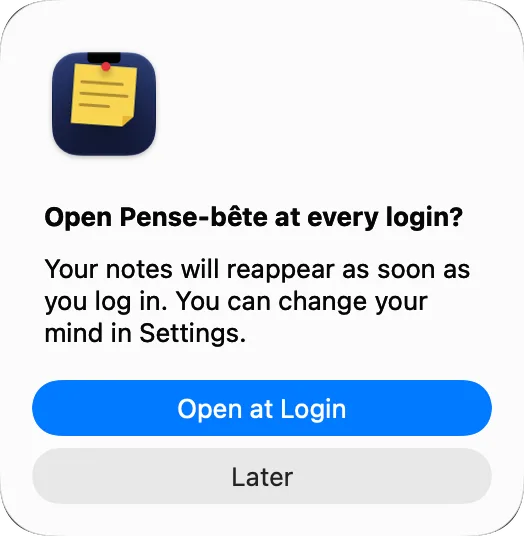
The first time you open it, Pense-bête puts a sample note below the notch and asks whether it should open when you log in.

- The question Open Pense-bête at every login? appears. Click Open at Login so your notes come back as soon as you log in, or Later if you'd rather start Pense-bête yourself.
- Double-click the Double-click to write note and replace its text with your own (see Writing in a note).
- Confirm with ⌘↩.
You're only asked once. You can change your mind at any time in Settings… › General: see Opening Pense-bête at login.
The Pense-bête menu
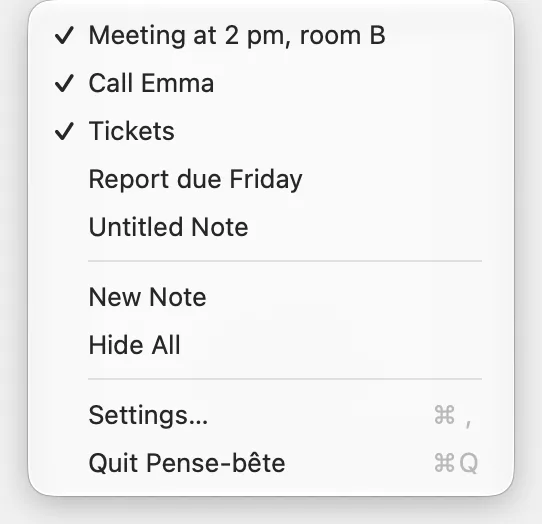
Click the Pense-bête icon in the menu bar to open its menu: your notes at the top, the commands below.
- Your notes, each one named after its first non-empty line, shortened with “…” beyond 32 characters; an empty note is called Untitled Note. A checkmark means the note is showing: click its line to hide it, click again to show it.
- New Note: creates a note and opens it right away so you can type.
- Hide All: hides all notes. When everything is hidden, the item becomes Show All.
- Settings… (⌘,): opens the Pense-bête Settings window.
- Quit Pense-bête (⌘Q): closes the app. The notes leave the screen with it and come back in the same place the next time you open it.
When there are no notes, the menu shows No Notes and Show All is dimmed: start with New Note.
Back to contentsWriting in a note
A note only switches to editing with a double-click or from its menu: a single click does nothing, so you can't change it by accident.
- Double-click the note (or right-click › Edit). It becomes a text area, with Esc to cancel and the Done button at the bottom.
- Type your text. The ↩ key starts a new line.
- Confirm with ⌘↩ or the Done button. Esc cancels: the note goes back to its previous text.
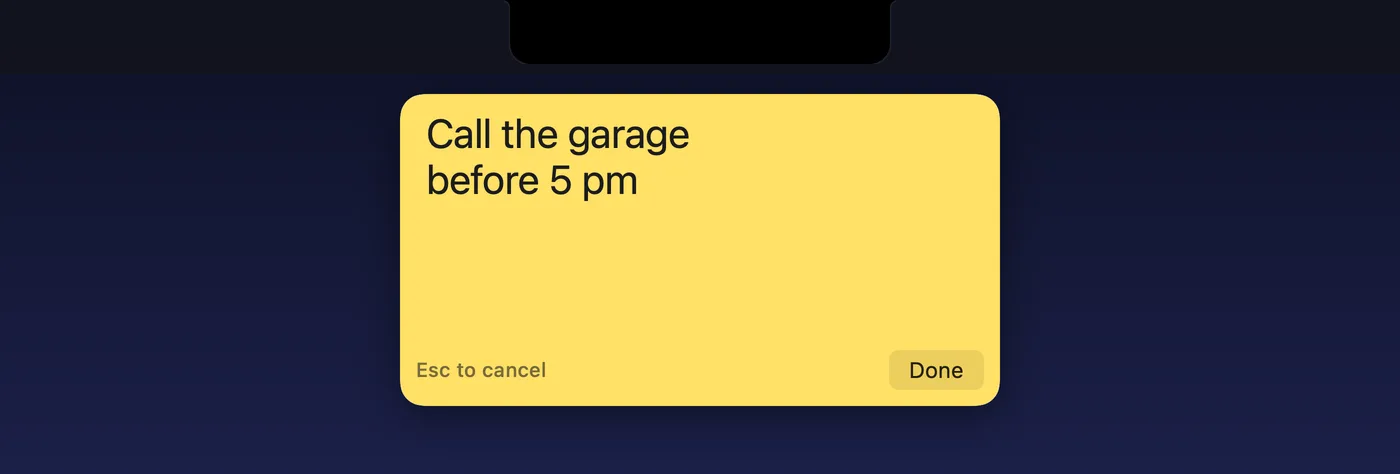
The keyboard then goes back to the app you were using: no need to click into your document again. Clicking in another window while you type also saves the text.
The size of the note
- The height follows the text, line by line, up to 40% of the screen height (not counting the menu bar and the Dock). Beyond that, the text scrolls inside the note.
- While you type, the note grows to at least four lines so you have room to write.
- The width doesn't change by itself: you set it in Colors, text and shape.
- A note without text shows Empty note, dimmed.
The note only takes the keyboard while you're typing. The rest of the time, checking an item or moving the note never pulls you out of the app you're working in.
Checklists
A note can become a list: one line per item, with a circle to check in front of each.
Making a list
- Write one item per line in a note.
- Right-click the note › Convert to Checklist. Each non-empty line becomes an item; empty lines, and spaces at the start and end of lines, are removed.
The same choice is in the note's settings: the Type row, Text or Checklist (see A note's settings).

Checking items
- Click the circle: the item is checked, crossed out and dimmed, and it stays in the list. Click again to uncheck it.
- Only the circle checks. An item's text behaves like the rest of the note: double-click to edit, drag to move.
- Checking doesn't switch the note to editing and doesn't take the keyboard away from you.
Editing a list
Double-click: the list is shown one line per item. Add, remove or reorder lines, then press ⌘↩. An item whose text hasn't changed keeps its checkmark, even if you moved it; a new or edited item comes back unchecked. Lines left empty are removed.
Right-click › Convert to Text turns each item back into a line, but the checkmarks are lost: if you switch back to a list afterwards, every item is unchecked.
Creating, duplicating, hiding, deleting
As many notes as you like, each with its own text, style and position.
Creating a note
Three ways:
- Pense-bête menu › New Note;
- the ⌃⌥N shortcut, from any app;
- the + button below the list of notes, in Settings… › Notes.
The new note opens straight away for editing, on the main display. It takes the first of these positions that no visible note is using: below the notch, top left, top right, bottom left, bottom right; if all five are taken, below the notch. It gets the default style: yellow background, 13 pt centered text, 220 pt wide. If you confirm or cancel it without text, it stays on screen and shows Empty note: delete it with right-click › Delete… if you don't want it.
Right-clicking a note
Right-click a note to open its menu. A list has the same commands, with Convert to Text instead of Convert to Checklist.
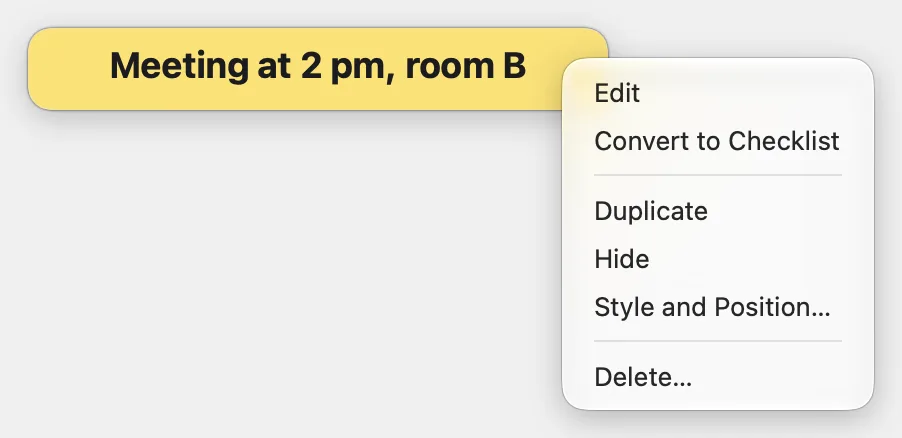
| Command | What it does |
|---|---|
| Edit | Switches the note to editing, like a double-click. |
| Convert to Checklist or Convert to Text | See Checklists. |
| Duplicate | Makes a copy of the note (text, style, checkmarks), shifted slightly right and down. |
| Hide | Hides the note; it stays in the Pense-bête menu. |
| Style and Position… | Opens this note's settings (see A note's settings). |
| Delete… | Deletes the note, after asking first if it isn't empty. |
Hiding and showing
- One note: right-click › Hide, or uncheck its line in the Pense-bête menu. Check the line again to bring it back.
- All notes: Hide All in the menu, or ⌃⌥P. The same shortcut, or Show All, brings them all back.
When only some notes are hidden, ⌃⌥P first hides the rest; press it again to show them all.
Deleting
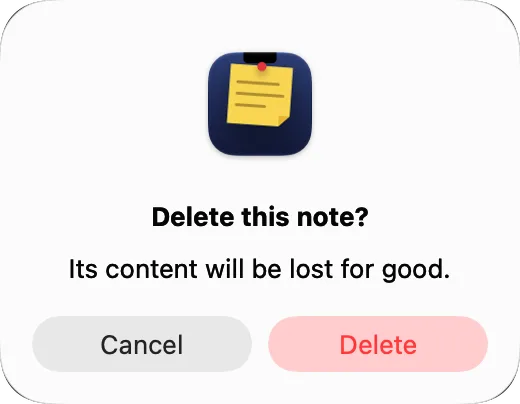
Right-click › Delete…, or the − button below the list of notes in Settings. If the note has text in it, Pense-bête asks Delete this note?: Delete confirms, Cancel backs out. An empty note is deleted without asking.
A deleted note can't be recovered: there's no trash and no undo. To set a note aside, hide it instead.
A note's settings
Each note has its own settings: content, colors, text, shape and position. Every change shows up right away on the note itself.
Opening a note's settings
Two ways:
- right-click the note › Style and Position…: the window opens directly on that note;
- or Pense-bête menu › Settings…, Notes tab, then choose the note in the list on the left.
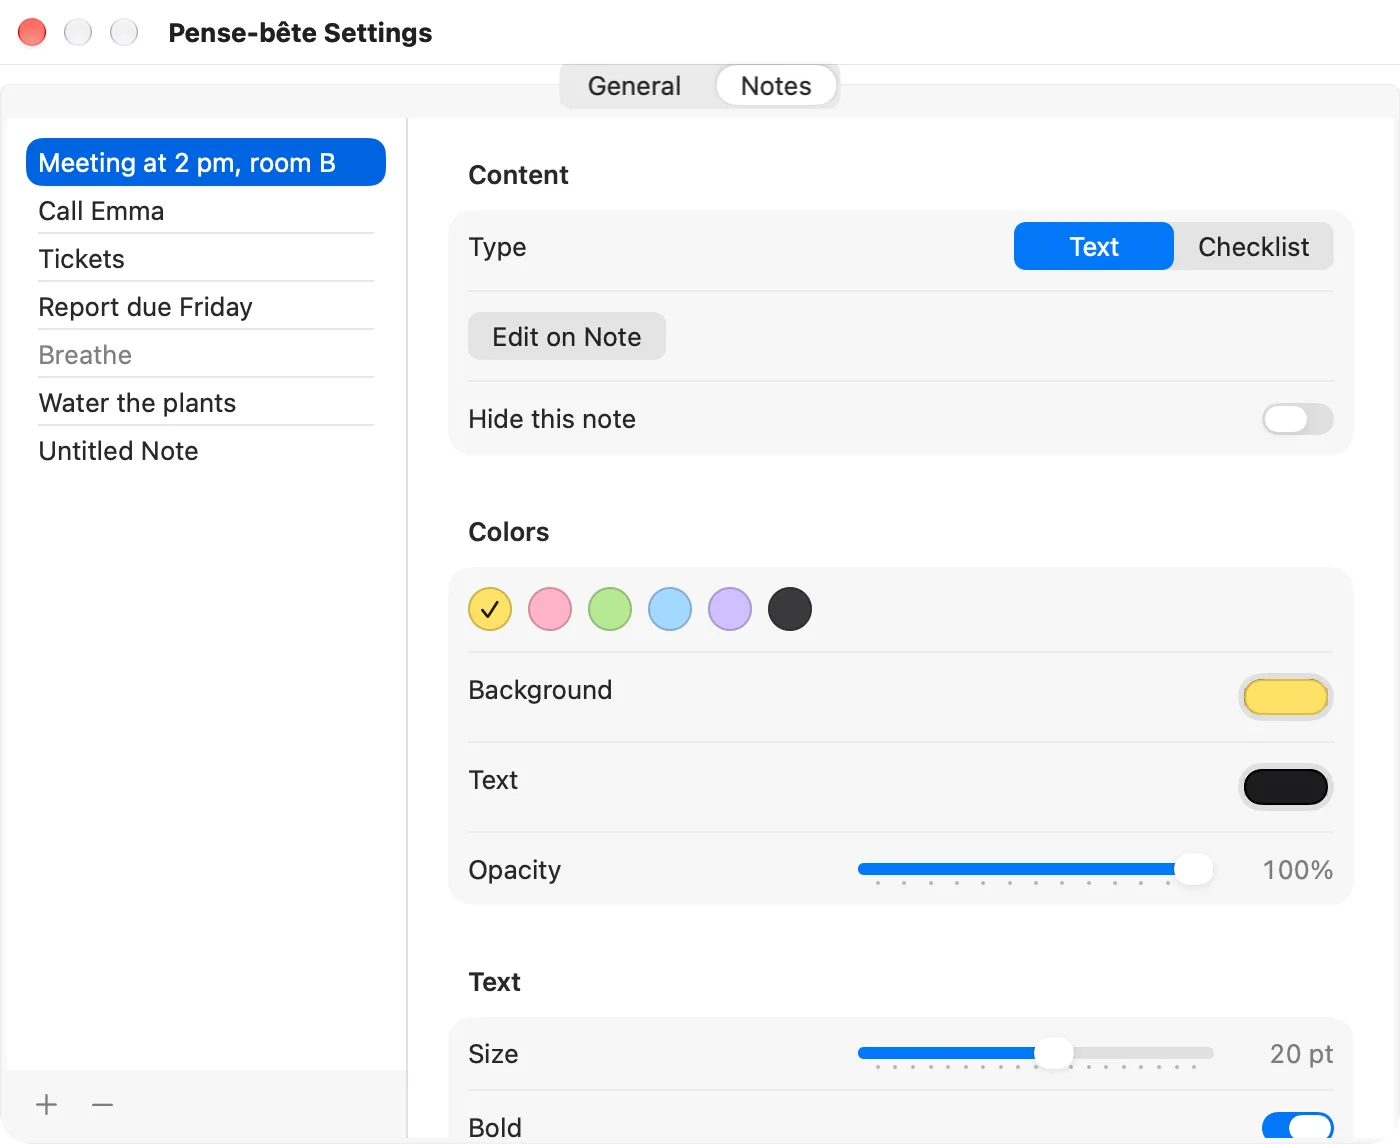
The list of notes
Each note is named after its first line; an empty note is called Untitled Note, and a hidden note is dimmed. The + button creates a note, the − button deletes the selected one (see Creating, duplicating, hiding, deleting). When no note is selected, the right side shows Choose a note from the list.
Content
- Type: Text or Checklist, just like the right-click menu (see Checklists);
- Edit on Note: opens the note for editing, even if it was hidden (it reappears). Once you confirm, the keyboard goes back to Settings;
- Hide this note: hides or shows it.
Close the window with its red button or ⌘W; the keyboard then goes back to the app you were using.
Back to contentsColors, text and shape
In the note's settings, three sections change how it looks. Scroll the right side of the window to see them all.
Colors
- Six presets: yellow, pink, green, blue, purple and graphite (light text on a dark background). Click a swatch: the background and text change together, and the swatch gets a checkmark.
- Background and Text: your own colors, with the macOS color picker. No swatch is checked then.
- Opacity: from 40 to 100%. Below 100%, whatever is behind the note shows through, blurred.
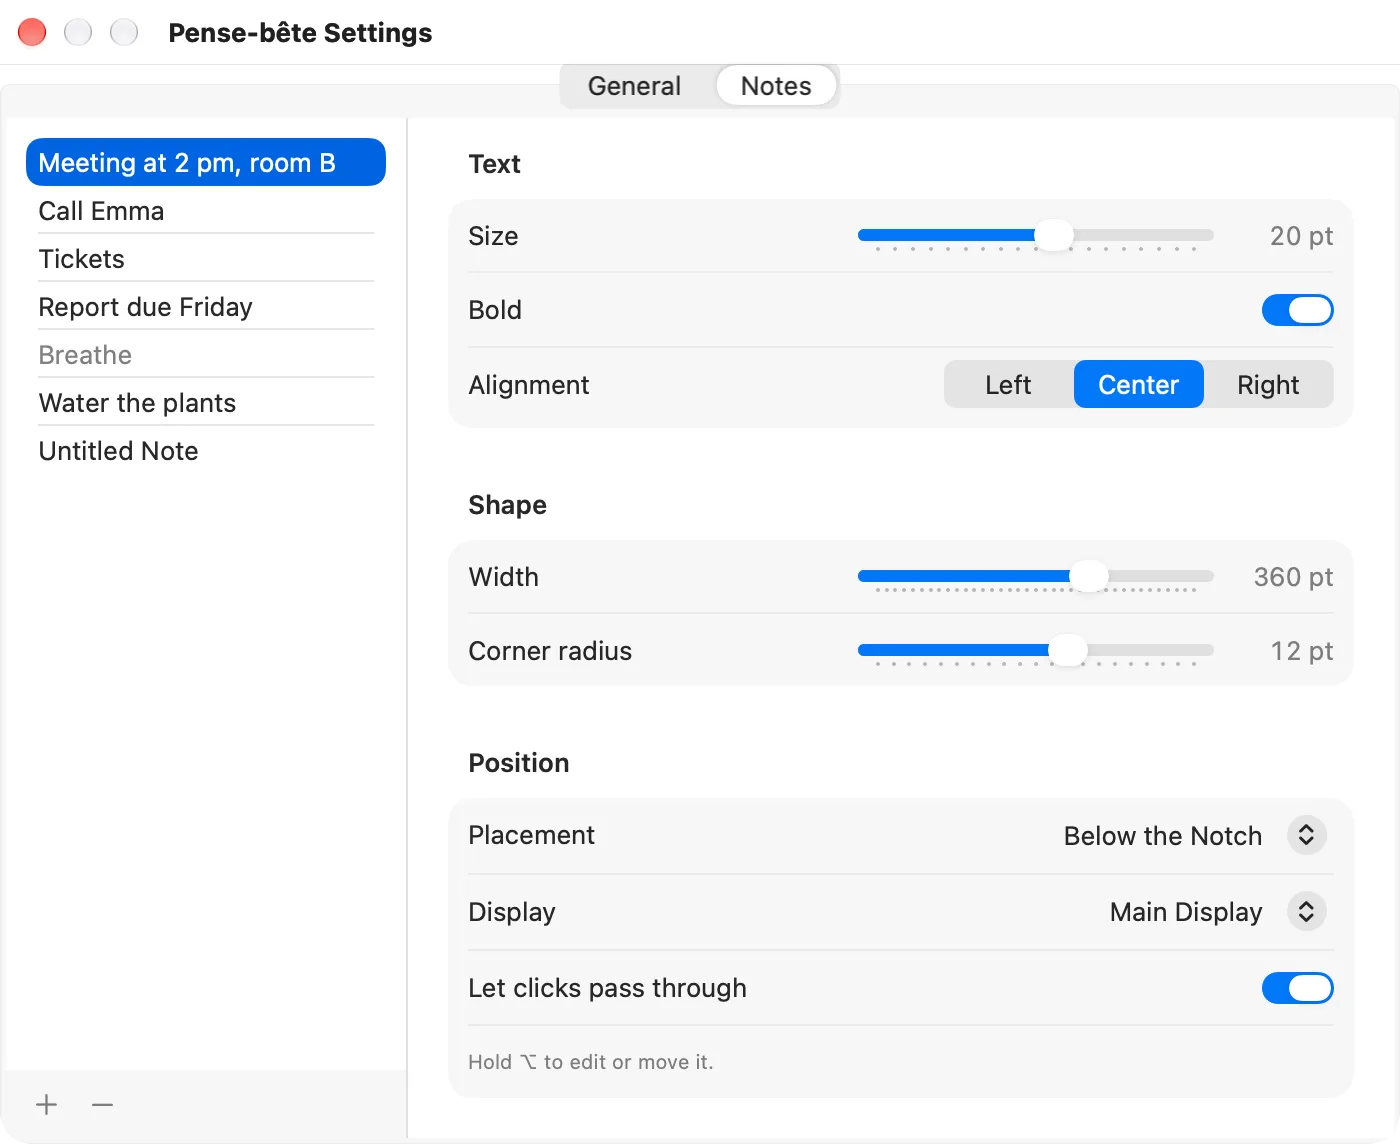
Text
- Size: from 10 to 28 pt;
- Bold: bold text or not;
- Alignment: Left, Center or Right.
Shape
- Width: from 120 to 480 pt, in steps of 10;
- Corner radius: from 0 (square corners) to 20 pt.
The height follows the text (see Writing in a note).
| Setting | Range | New note |
|---|---|---|
| Colors | 6 presets or any color | Yellow |
| Opacity | 40 to 100%, in steps of 5% | 95% |
| Size | 10 to 28 pt | 13 pt |
| Bold | on or off | off |
| Alignment | Left, Center, Right | Center |
| Width | 120 to 480 pt | 220 pt |
| Corner radius | 0 to 20 pt | 12 pt |
A copy made with right-click › Duplicate keeps the whole style: handy for a set of matching notes.
Placing a note
A note can sit below the notch, in a corner, or anywhere you drag it, on the display of your choice.
With the mouse
Drag the note wherever you like. Its position becomes Free (Moved by Hand), anchored at the top: if the text gets longer, the note grows downward. It now belongs to the display where you dropped it: the Display menu in its settings shows that display's name. A note that's being edited can't be moved: confirm first.
At a set position
In the note's settings, Position section, Placement menu:
- Below the Notch: centered at the top, just below the notch, or below the menu bar on a display without a notch;
- Top Left, Top Right, Bottom Left, Bottom Right: in the corner, 10 pt from the edge, never under the menu bar or the Dock.
Wherever it sits, a note always stays fully on screen: if the resolution changes or the Dock moves, Pense-bête brings it back into the visible area.
Several displays
The Display menu offers Main Display (the one with the menu bar) and each connected display, under the name macOS gives it. If the chosen display is disconnected, the note moves to the main display and the menu shows Disconnected Display; it goes back to its display as soon as it's reconnected. New notes appear on the main display.
Back to contentsLetting clicks pass through
A note sitting over a button or your document can become transparent to the mouse: your clicks go right through it.
- Open the note's settings: right-click › Style and Position….
- In the Position section, turn on Let clicks pass through.
The note stays on screen but no longer reacts to the mouse. To take hold of it again, hold down ⌥: as long as the key is down, you can double-click it, drag it, check its items and right-click it for its menu, like any other note. Letting go of ⌥ in the middle of a drag doesn't drop it: it follows the mouse until you release the button.
The Edit on Note button in the settings also opens the note for editing, without ⌥. While you type, the note takes clicks as usual.
Keyboard shortcuts
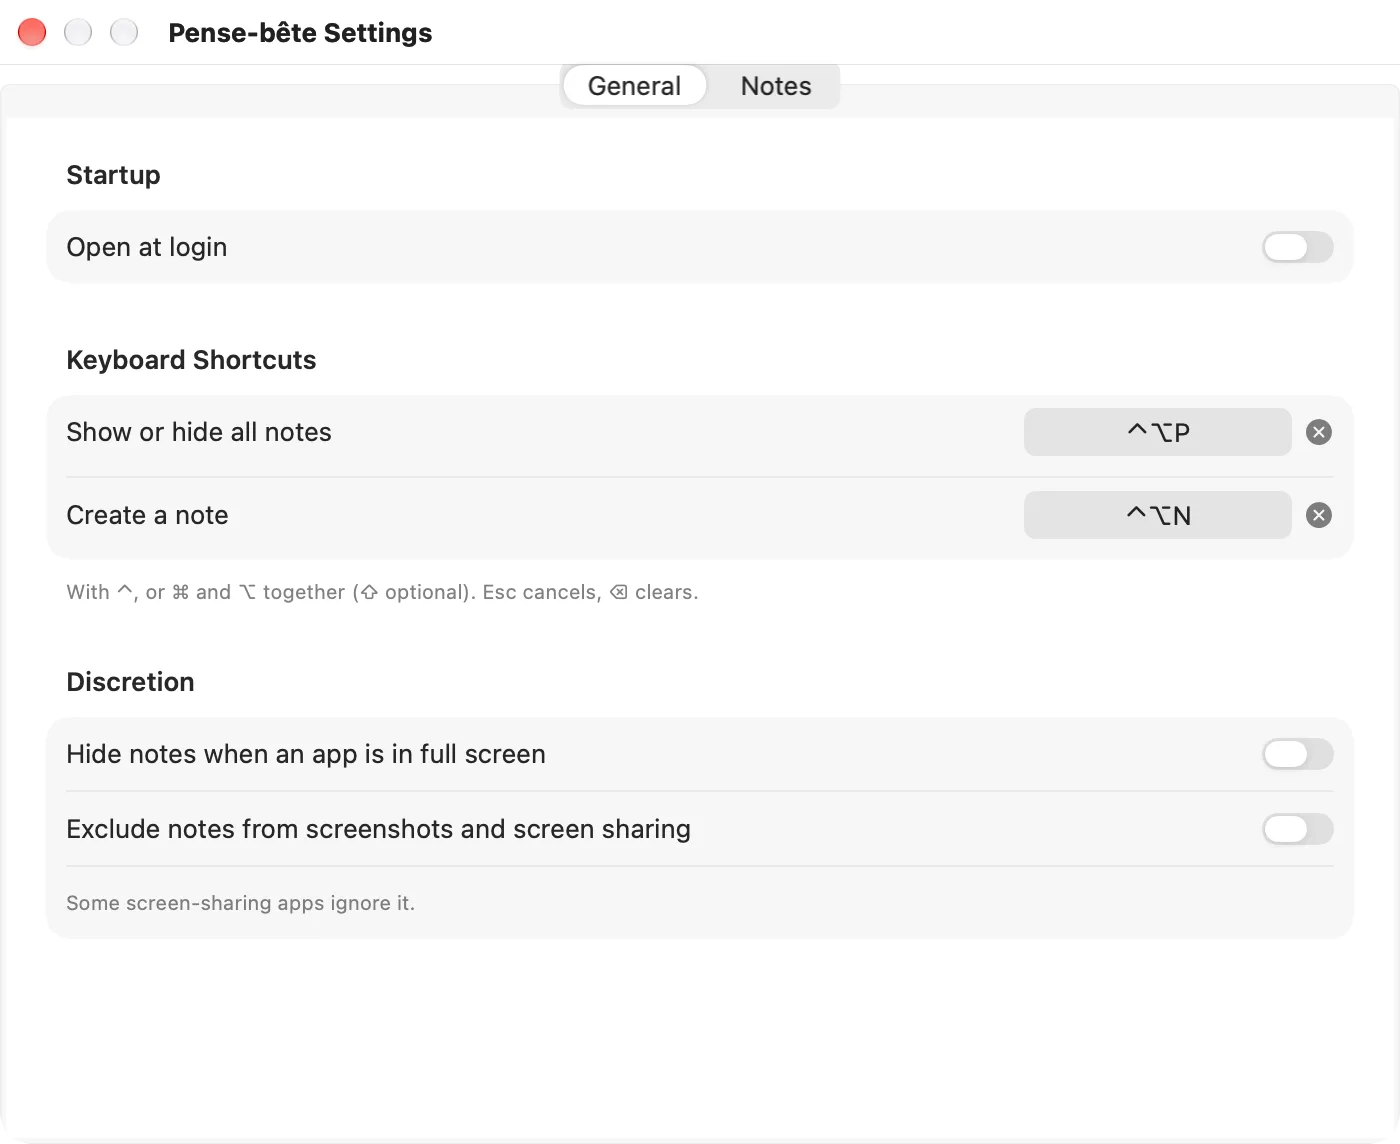
Two shortcuts work from any app, with no Accessibility permission to grant.
| Shortcut | Action |
|---|---|
| ⌃⌥P | Show or hide all notes |
| ⌃⌥N | Create a note: it opens for editing; ⌘↩ confirms it and hands the keyboard back to you. |
Changing a shortcut
- Open Settings… › General, Keyboard Shortcuts section.
- Click the shortcut: the button shows Type the shortcut….
- Type the new combination. It must include ⌃, or ⌘ and ⌥ together; ⇧ can be added. If a combination is refused, the Mac beeps and Pense-bête waits for the next one.
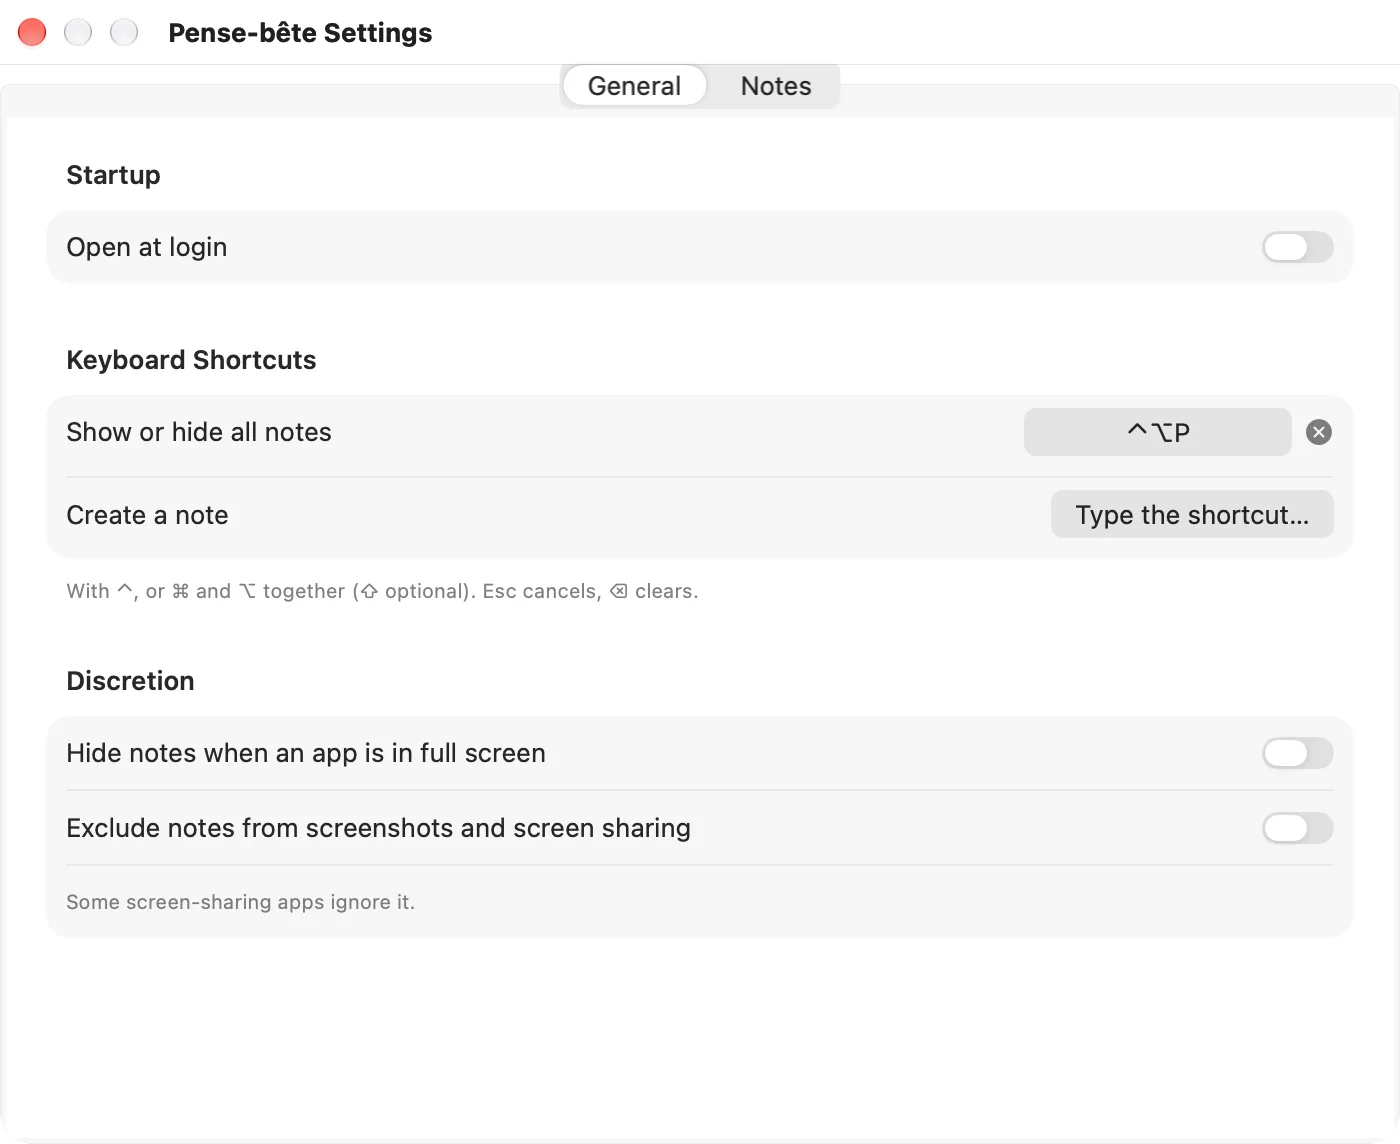
- Esc gives up without changing anything;
- ⌫ clears the shortcut: the button shows None. The small cross to the right of the button does the same;
- the two actions can't share a shortcut: the Mac beeps;
- almost any key will do: letters, digits, punctuation, function keys (F1 to F20), space, arrows, ↩, ⇥… always with ⌃, or ⌘ and ⌥.
While a shortcut is being recorded, the Pense-bête shortcuts are paused: typing the old one records it instead of triggering it. Clicking the button again, or switching to another window, stops recording.
Shortcut already taken
If macOS already uses the combination, or another app has reserved it, Pense-bête says so in red under the row: This shortcut is already used by macOS: choose another one. or This shortcut is already used by another app: choose another one. An app that uses the same combination without reserving it can't be detected: if a shortcut also triggers something else, change it.
While a Pense-bête alert is open (such as the confirmation before deleting), its shortcuts do nothing.
Opening Pense-bête at login
To find your notes as soon as you log in, let Pense-bête start by itself.
- Open Settings… › General.
- In the Startup section, turn on Open at login.
As long as this setting is off (which is the case at first, unless you accepted on first launch), Pense-bête only opens when you start it.
macOS may ask for your approval. Pense-bête then says so under the switch: macOS is waiting for your approval in System Settings. Click Open System Settings…: macOS shows the list of apps that open at login, where you allow Pense-bête. If macOS refuses the change, the message Couldn't change the login setting. appears in red.
Back to contentsDiscretion: full screen and screenshots
Two settings in Settings… › General, Discretion section, control how discreet your notes are.
In full screen
By default, notes stay visible above apps in full screen (switched to full screen with their green button, for example). To have them step aside, turn on Hide notes when an app is in full screen.
- It's decided display by display: a full-screen video on an external display doesn't hide the MacBook's notes.
- Only full screen counts: a window enlarged to the maximum doesn't hide the notes.
- The notes come back when the app leaves full screen. Pense-bête checks each time you switch apps or desktops, and every two seconds: allow for a short delay at times.
- A note you're editing stays visible.
Screenshots and screen sharing
Exclude notes from screenshots and screen sharing asks macOS to keep the notes out of screenshots and screen sharing. As the line below it says, Some screen-sharing apps ignore it. So there's no guarantee the notes will stay out of the picture.
Before a video call or a screenshot that others will see, run a test with your tool. If a note shows up, hide all notes for the session with ⌃⌥P.
Your notes and their file
Your notes stay on this Mac. Pense-bête has no account and no iCloud sync, and never connects to the internet: ElpisIA receives nothing you write.
- Everything saves itself, at most half a second after each change, and when the app quits: there's no Save button. Anything you're typing when you quit is kept.
- The notes fit in a single file,
notes.json, stored in the app's folder:~/Library/Containers/com.elpisia.pensebete/Data/Library/Application Support/Pensebete/. The General tab settings are in the app's preferences, except opening at login, which macOS manages. - There's no export feature. To keep a copy of your notes, copy this file: in the Finder, choose Go › Go to Folder… (⇧⌘G) and paste the path above. To restore it, quit Pense-bête, put the file back, then open the app again.
If something goes wrong with the file
Pense-bête never loses anything silently: an alert explains what's happening, at launch or the first time saving fails.
| Message | What happens |
|---|---|
| The notes file was unreadable | The damaged file is set aside in the same folder (its name starts with notes.json.corrompu) and Pense-bête starts over with a sample note. Show in Finder shows the copy. |
| The notes file couldn't be read | Pense-bête shows a sample note and leaves your file untouched: nothing is saved during this session, and your changes will be lost when you quit. Show in Finder shows the file. |
| The notes file comes from a newer version | The file was written by a newer version of Pense-bête: update the app to get your notes back. Until then, Pense-bête shows a sample note, leaves your file untouched and saves nothing. |
| Couldn't save your notes | Saving failed (a full disk, for example); the reason is given. Pense-bête tries again with each change. This alert only appears once per session, after you've finished typing. |
All gestures and shortcuts
| Gesture or key | What it does |
|---|---|
| Double-click a note | Edit it |
| ⌘↩ or Done | Confirm your changes |
| Esc | Cancel your changes |
| ↩ while typing | Start a new line |
| Click a circle | Check or uncheck an item |
| Drag a note | Move it (Free (Moved by Hand) position) |
| Right-click a note | Its menu: Edit, Convert to Checklist or Convert to Text, Duplicate, Hide, Style and Position…, Delete… |
| Hold ⌥ | Take hold of a note that lets clicks pass through |
| ⌃⌥P | Show or hide all notes, from any app |
| ⌃⌥N | Create a note, from any app |
| ⌘, and ⌘Q, with the Pense-bête menu open | Settings… and Quit Pense-bête |
| ⌘W | Close the Settings window |
Both global shortcuts can be changed in Settings… › General (see Keyboard shortcuts).
Back to contentsTroubleshooting
The Pense-bête icon has disappeared from the menu bar
The notch may be hiding it. If Pense-bête is running, open it again from the Applications folder or Spotlight: its Settings window opens. If it was quit, start it the same way: the icon comes back, along with your notes.
My notes are no longer on screen
- They may be hidden: ⌃⌥P, or Show All in the menu.
- An app is in full screen and Hide notes when an app is in full screen is on: they'll come back when it leaves full screen.
- Pense-bête was quit: start it again (or turn on opening at login).
- Their display was disconnected: they've moved to the main display.
I can't click a note any more
It lets clicks pass through: hold ⌥ to handle it, or turn off Let clicks pass through in its settings (see Letting clicks pass through).
A shortcut does nothing
Open Settings… › General. A red message under the shortcut means it's already taken: choose another combination. If the button shows None, the shortcut was cleared: click it and type a new one. Also check that no Pense-bête alert is still open.
A note scrolls instead of growing
It has reached 40% of the screen height. Make it wider (Width), make the text smaller (Size), or split the content over two notes.
Back to contents