
This tutorial walks you through ScreenConf step by step: granting the two macOS permissions, picking the iPad and the destination, starting and stopping the display, using Quick Setup and activating your licence. Each chapter shows where to click, with screenshots.
- Mac, macOS 26 or later
- 13 chapters
- 1 video
- ScreenConf 1.4.1, October 2026
All screenshots show made-up data: Camille's iPad, two external displays called “ProView 32” and “ProView 24”, an invented licence key. They were taken with a simulated QuickTime, without changing any of the Mac's settings. The video is sped up and has no sound.
Contents (13 chapters)
Before you start
ScreenConf shows the screen of your iPad, connected over USB, on a large display attached to your Mac. It does nothing you could not do by hand: it chains the steps in QuickTime Player, Apple's app that comes with macOS.
What it does for you
- opens QuickTime Player and its “New Movie Recording” window;
- picks the iPad in that window's source menu;
- puts the window on the external display or on the Mission Control desktop you chose;
- goes full screen (on an external display);
- and, when you are done, closes everything.
Nothing is recorded: ScreenConf never starts QuickTime's recording. Only the live picture is shown, and no video file is created.
What you need
- A Mac running macOS 26 or later, Apple silicon or Intel, with QuickTime Player (included with macOS).
- An iPad or iPhone and its USB cable. Sidecar and AirPlay are not supported.
- An external display, or several Mission Control desktops.
- Two macOS permissions: Accessibility and Automation (see Granting the permissions).
The interface follows your preferred languages in macOS: the first one ScreenConf knows among French, English, Spanish and German, otherwise English. There is no account to create.
Back to contentsInstalling and opening ScreenConf
ScreenConf is sold outside the Mac App Store, from the ElpisIA shop. It is signed by ElpisIA (Developer ID) and notarised by Apple.
- On the ScreenConf page of the ElpisIA shop (shop.elpisia.com), download the disk image (a .dmg file).
- Open it: a window shows ScreenConf and the Applications folder. Drag ScreenConf onto Applications.
- Open ScreenConf from the Applications folder. The first time, macOS asks you to confirm opening an app downloaded from the internet: confirm.
The first launch starts the 14-day free trial, with every feature. ScreenConf opens its window and adds a display icon to the menu bar, at the top right.
Once the app is copied, you can eject the disk image and move the .dmg file to the Bin.
Granting the permissions
To drive another app, macOS requires two permissions. ScreenConf only uses them during a launch, a source detection or a stop.
Accessibility
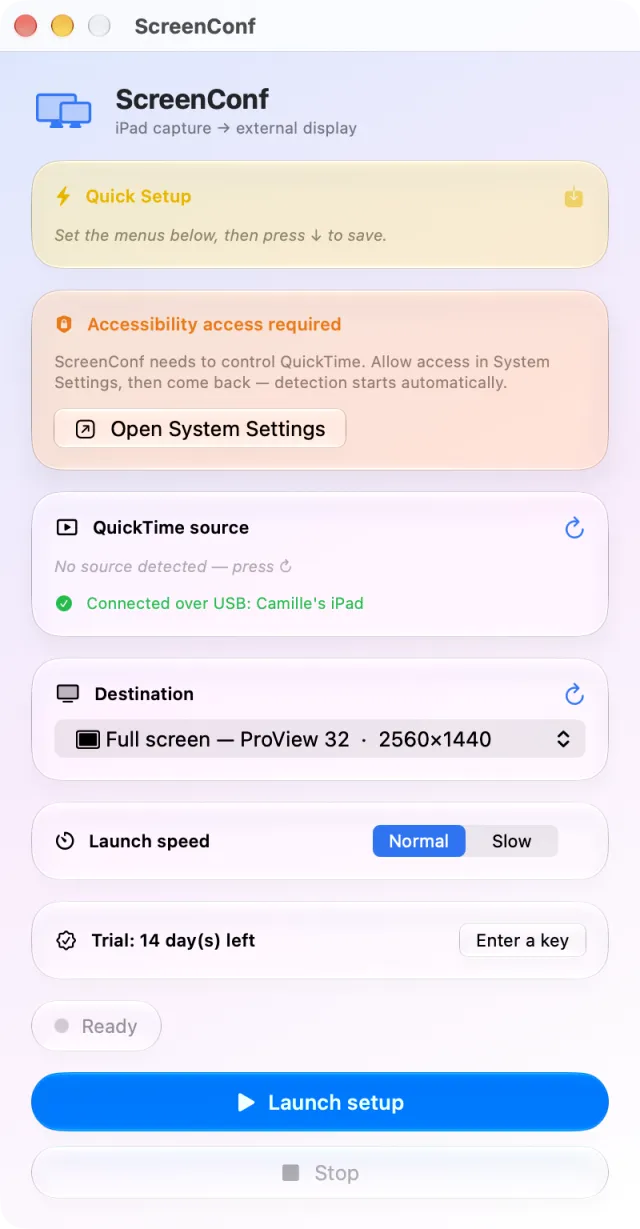
It lets ScreenConf click in QuickTime's source menu. While it is missing, an orange Accessibility access required card appears below the Quick Setup card.
- Click Open System Settings in the orange card: macOS shows its own prompt and opens System Settings › Privacy & Security › Accessibility.
- Turn ScreenConf on in the list.
- Come back to ScreenConf: the card disappears and source detection starts on its own.
Automation
It lets ScreenConf send commands to QuickTime Player and System Events. macOS asks for it itself the first time ScreenConf needs it, usually during the first detection: once for QuickTime Player, once for System Events, with this message: “ScreenConf controls QuickTime Player and System Events to set up your display automatically.” Accept both.
If you refused, the Automation refused card appears. Click Open System Settings, tick QuickTime Player and System Events under ScreenConf in System Settings › Privacy & Security › Automation, then come back to the app.
A refusal during a detection also shows the red Launch failed card and the Error status, even though nothing was launched. Once the permission is granted, click the source's ↻ to read the list again; the red card goes away at the next launch.
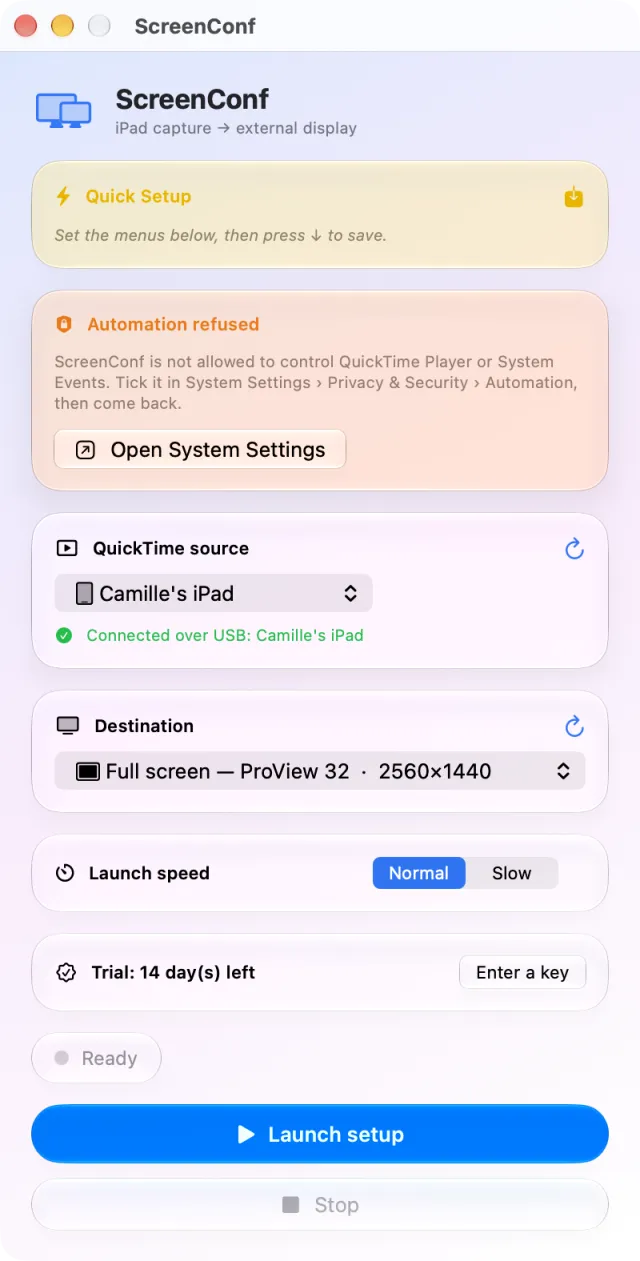
ScreenConf checks both permissions again every time you come back to its window. After an app update, macOS may ask for Accessibility again: the orange card comes back and takes you there.
The window at a glance
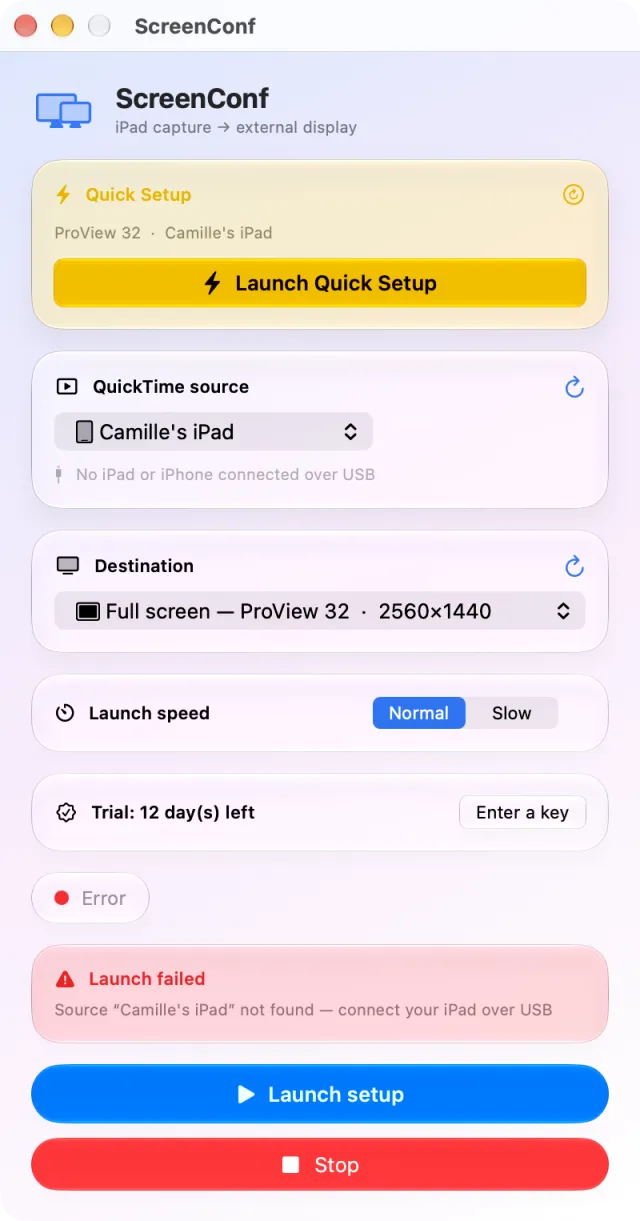
ScreenConf fits in a single window, laid out from top to bottom in the order you need it.
- Quick Setup (yellow card): your last successful configuration and the Launch Quick Setup button (see Quick Setup).
- QuickTime source: the iPad or camera to show, the ↻ button that reads the list again, and a line telling you whether an iPad or iPhone is connected.
- Destination: the external display or Mission Control desktop that receives the picture, with its own ↻ button.
- Launch speed: Normal or Slow.
- Licence: the trial days left or the active licence, and the Enter a key button.
- Status pill: grey Ready, orange during a launch with the current step, green Running, red Error.
- The Launch setup and Stop buttons.
The orange permission cards and the red error card only appear when needed. The window keeps a fixed width; its height follows its content.
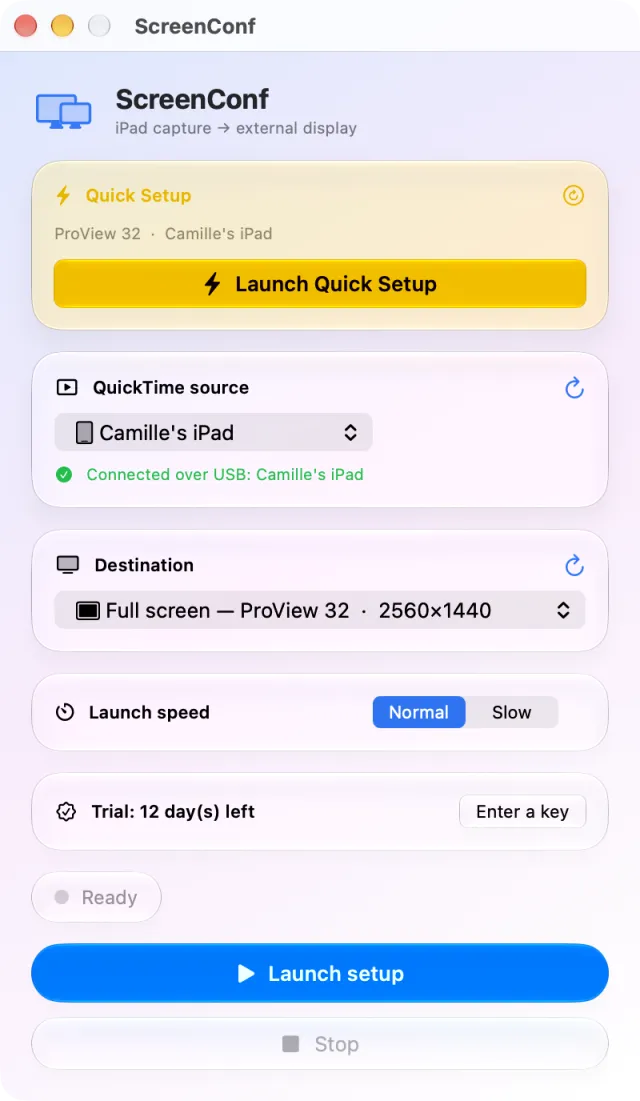
Hover over a ↻ button, the arrow on the Quick Setup card or the Launch speed row: a tooltip explains what they do.
Picking the source: your iPad
The source is the device whose picture QuickTime shows. ScreenConf reads the list from QuickTime's source menu and automatically picks the connected iPad or iPhone.
Connecting the iPad
- Connect the iPad (or iPhone) to the Mac with a USB cable and unlock it.
- The first time, the iPad asks whether to trust this computer: accept.
- Below the source menu, a green line gives the device's name, for example Connected over USB: Camille's iPad. With no device, it reads No iPad or iPhone connected over USB.
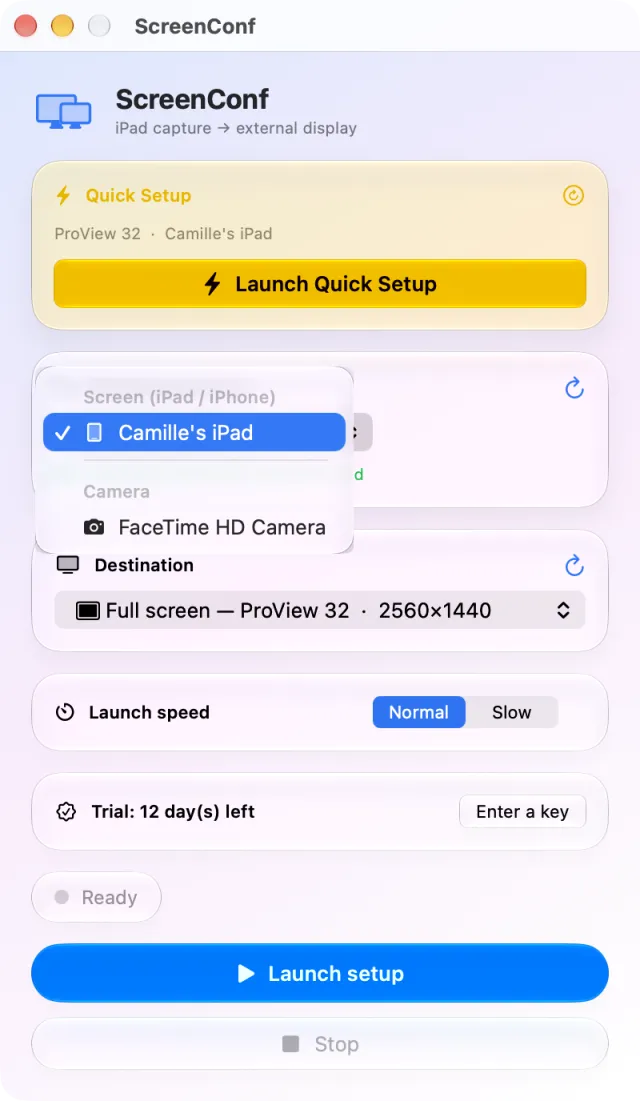
The source menu
It has two sections: Screen (iPad / iPhone), the devices whose screen QuickTime can show, and Camera, the Mac's cameras. The default choice is the connected device, otherwise the first screen source, otherwise the first source in the list.
When is the list read?
To read the sources, ScreenConf opens QuickTime for a few seconds in the background, hidden, then closes it. It does so:
- on first launch, as soon as Accessibility is granted;
- when you connect an iPad or iPhone, if nothing is running;
- when you click ↻, to the right of QuickTime source (Detect sources (opens QuickTime briefly)). While it reads, a spinner replaces ↻.
While Accessibility is missing, ↻ (like connecting an iPad) shows the macOS prompt instead of reading the list.
The last list read is kept: the next times you open the app, it appears at once, without opening QuickTime. If the list is empty, the card shows No source detected — press ↻.
QuickTime already has documents open
Reading the sources quits QuickTime without saving. So ScreenConf first counts its documents:
- automatic reading (first launch, device connected): if QuickTime has a document open, it does not happen, and no message is shown;
- ↻: ScreenConf asks Quit QuickTime Player?. Cancel, the default (Return key), closes nothing; Quit and Detect quits QuickTime without saving, then reads the list.
Save anything you want to keep in QuickTime first.
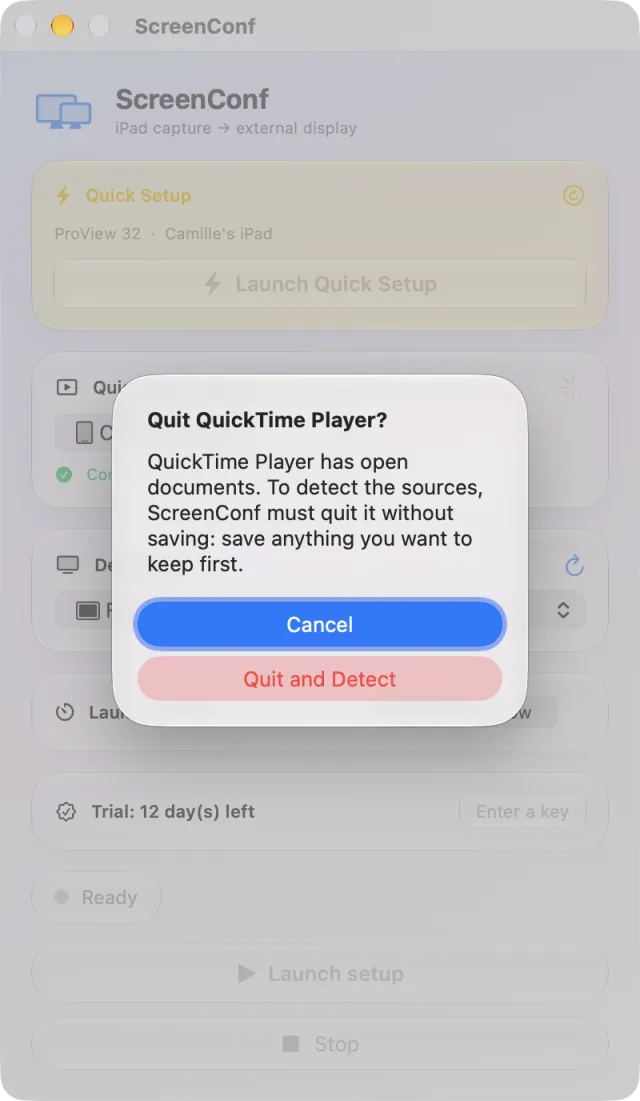
The iPad does not show up? Check the cable, unlock the iPad, accept to trust this computer, then click ↻. An iPhone used as a Continuity Camera does not count as a connected device: you need the cable.
ScreenConf can read QuickTime's menu when macOS is in French, English, Spanish or German. With macOS in another language, it may find no source at all, and the launch fails.
Picking the destination
The destination tells ScreenConf where to show the iPad's picture: full screen on an external display, or on a specific Mission Control desktop.
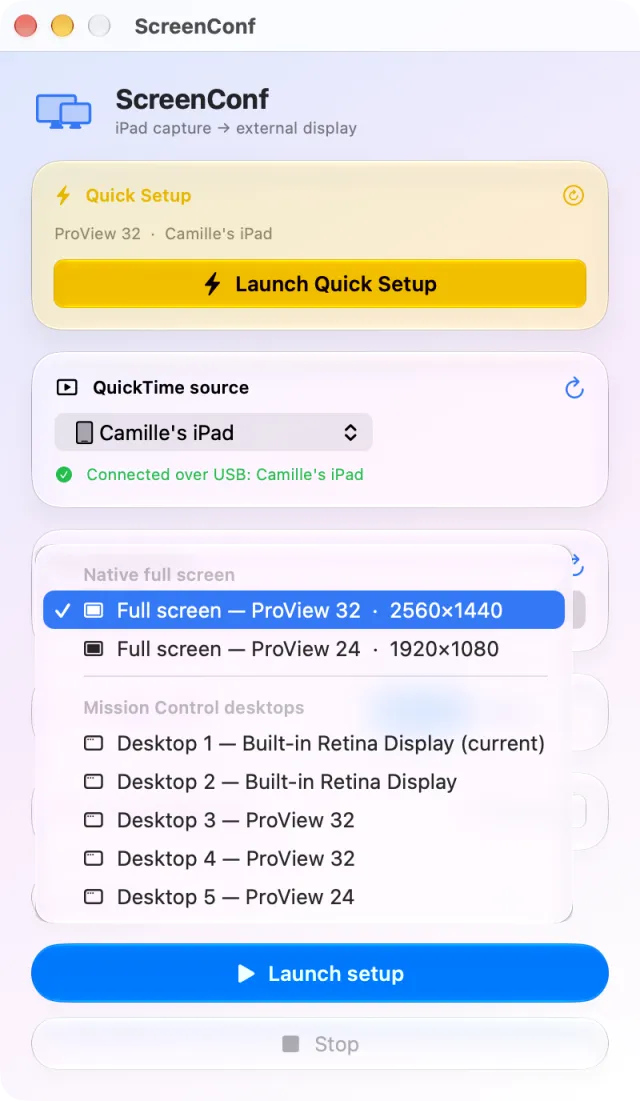
The Destination menu has two sections:
- Native full screen: one line per external display, with its name and its size in points, for example “Full screen — ProView 32 · 2560×1440”. Displays are listed from largest to smallest. The Mac's built-in display is not listed.
- Mission Control desktops: every desktop, numbered as in Mission Control, with the name of its display, for example “Desktop 3 — ProView 32”. The desktop you are on is marked (current). Full-screen apps are not listed.
By default, ScreenConf picks the largest external display, in native full screen. With no external display, nothing is picked for you: the menu shows Select… and Launch setup stays greyed out until you pick a desktop. Plug in or unplug a display and the list updates by itself. After adding or removing a desktop in Mission Control, click the card's ↻ (Refresh displays and Mission Control desktops).
Full screen or desktop?
| Native full screen | Mission Control desktop | |
|---|---|---|
| Displays offered | External displays only | All of them, built-in display included |
| What ScreenConf does | Puts QuickTime's window on the display, then makes it full screen: macOS gives it its own space | Shows that desktop on its display, puts QuickTime's window there and enlarges it to the size of the display, without full screen |
| Handy if… | You want the iPad big on the monitor, with nothing around it | You organise your apps by desktop, or you have no external display |
With no external display and no desktop detected, the card shows No external display or desktop detected. The list of desktops relies on internal macOS functions: should a version of macOS remove them, only external displays will be offered.
Launching and stopping
Launching
- Check the source and the destination.
- Click Launch setup (or ⌘R).
- Let it work: the orange pill shows each step. Avoid clicking elsewhere in the meantime: ScreenConf is driving QuickTime on screen.
- The pill turns green, Running: the iPad appears on the chosen display.
The steps, on an external display: Opening QuickTime…, Selecting the source…, Moving to the display…, Entering full screen…. On a desktop: Switching desktop…, Opening QuickTime…, Moving to the desktop…, Selecting the source….
Every successful launch with a source chosen in the menu becomes the Quick Setup.
The Launch setup button stays greyed out while no destination is chosen, during a launch, a detection or while the display is Running, and once the trial is over without a licence. If no source is chosen, ScreenConf takes the first screen source in QuickTime's menu.
Stopping
Click Stop (or ⌘.): Stopping…, then Ready. ScreenConf closes QuickTime's window without saving anything and quits QuickTime.
If you quit QuickTime yourself (⌘Q in QuickTime), ScreenConf notices and goes back to Ready. If you only close QuickTime's window, ScreenConf stays Running: click Stop.
Quitting ScreenConf does not quit QuickTime. And after you reopen ScreenConf, Stop stays greyed out: quit QuickTime yourself.
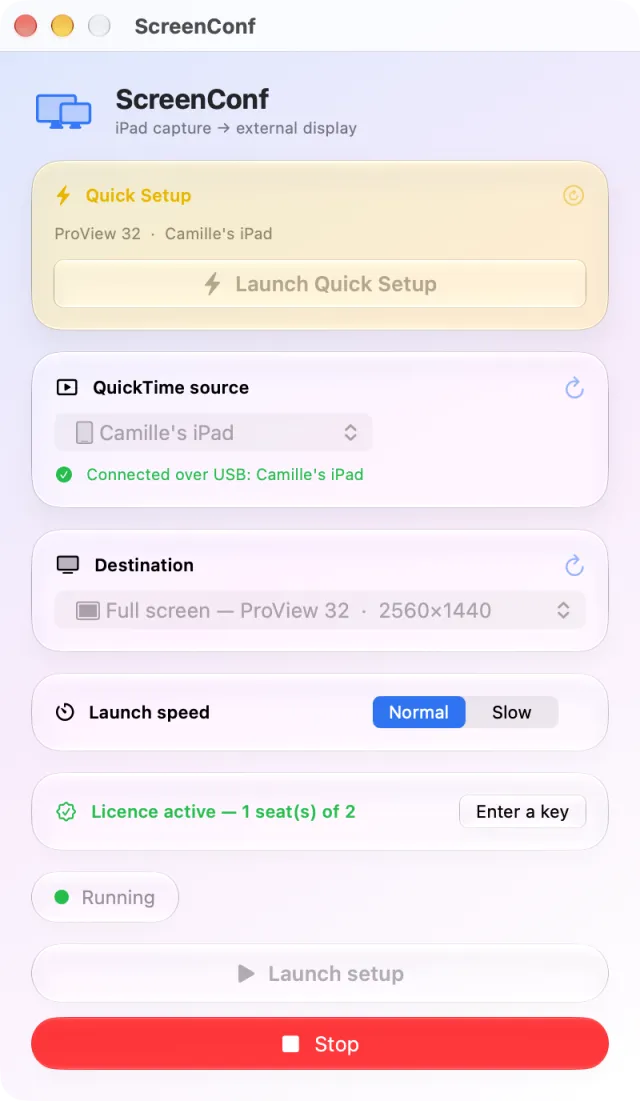
Stop closes every document open in QuickTime, without saving, not just the iPad window. If you are working on a movie in QuickTime, save it before stopping.
During a launch, Launch setup, Launch Quick Setup, Stop, both ↻ buttons, the menus and the speed stay greyed out until the end: a launch cannot be interrupted, and ScreenConf never opens QuickTime twice.
Quick Setup, in one click
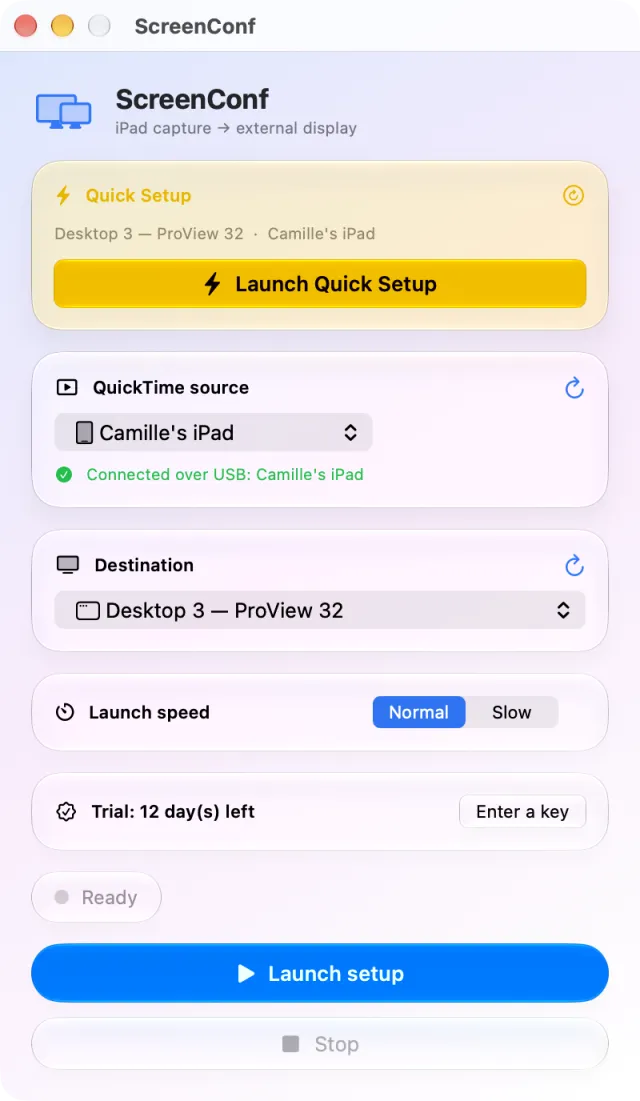
Quick Setup remembers a complete configuration (source, desktop or display) so you can launch it again in a single click.
How it gets filled
- On its own: after every successful launch, the configuration used replaces the Quick Setup (if a source was chosen in the menu).
- By hand: set the menus, then click the ↓ arrow at the top right of the yellow card (Save the current configuration as Quick Setup). Once a Quick Setup is saved, this button becomes a circular arrow: Update Quick Setup with the current configuration. It is greyed out with no source or no destination, and while the display is running.
With no Quick Setup, the card reads Set the menus below, then press ↓ to save. Once a Quick Setup is saved, the card sums it up on one line: the desktop or the display, then the source, for example “Desktop 3 — ProView 32 · Camille's iPad”.
Launching it again
Click Launch Quick Setup, in the window or in the menu of the menu bar icon (or ⇧⌘R while ScreenConf is the active app). ScreenConf puts the saved source and destination back into the menus, then launches. While the display is Running, the button is greyed out: stop first.
- A desktop is found by its number in Mission Control. If it no longer exists, ScreenConf uses native full screen on that desktop's display, if it is a connected external display.
- A display is found by its name.
- If nothing matches (a display unplugged, for example), ScreenConf launches to the destination shown in the menu, without warning.
- If the saved source is no longer in the list, ScreenConf takes the connected device, otherwise the first screen source, otherwise the first source in the list.
Adding or reordering desktops shifts their numbers: the Quick Setup may then point to another desktop, and its summary does not change. Click the ↻ of the Destination card, choose the right desktop, then update the Quick Setup with the circular arrow.
Launch speed
Between two steps, ScreenConf waits for QuickTime to respond, up to a time limit. A busy or older Mac may need more time.
- Normal: the original setting.
- Slow: doubles every wait and every pause. The launch takes a little longer, but QuickTime has time to keep up.
Choose Slow if QuickTime opens but the picture stays on the wrong display, if the source is not selected or if a time-out error appears. Your choice is remembered.
Back to contentsMenu bar and shortcuts
You can also drive ScreenConf without its window, from the menu bar.
The menu bar icon
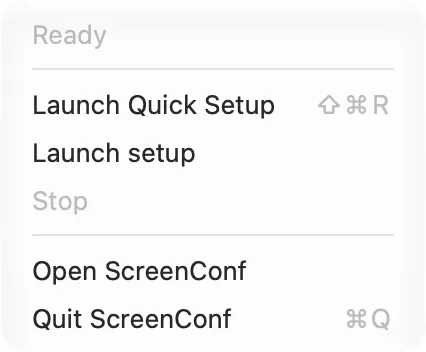
Its menu shows the status (Ready, the current step, Running…), then Launch Quick Setup, Launch setup, Stop, Open ScreenConf and Quit ScreenConf. The icon shows two displays while the picture is running.
Closing the window does not quit ScreenConf: the app stays in the menu bar, and Launch Quick Setup still works there. Clicking its Dock icon reopens the window. To quit: Quit ScreenConf or ⌘Q.
Shortcuts
| Shortcut | Action |
|---|---|
| ⌘R | Launch setup |
| ⇧⌘R | Launch Quick Setup |
| ⌘. | Stop |
| ⌘Q | Quit ScreenConf |
The first three are in the Setup menu and work while ScreenConf is the active app. The Help menu offers ScreenConf Support, which opens the app's support page in your browser.
macOS may adapt a shortcut to your keyboard layout: with a French AZERTY keyboard, the Setup menu shows ⌘; for Stop.
Back to contentsTrial and licence
You can try ScreenConf for 14 days, with every feature. After that, a licence bought from the ElpisIA shop lets you carry on.
During the trial
The 14 days count from the first launch. The licence row of the window gives the days left, for example Trial: 12 day(s) left. Nothing is restricted.
Activating a licence
- Buy a licence on the ScreenConf page of the ElpisIA shop (the app's Buy a licence link). The key arrives by e-mail after payment.
- In ScreenConf, click Enter a key.
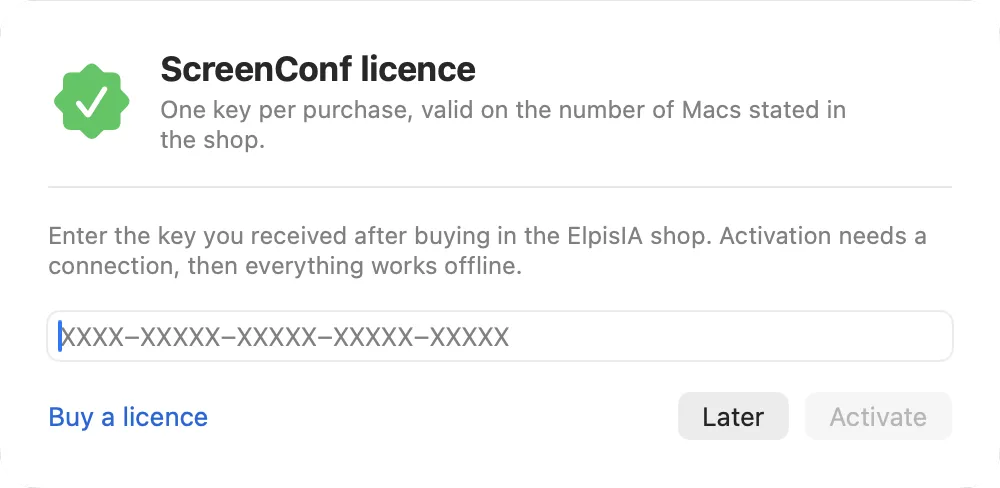
- Paste the key into the field, which shows the greyed-out example
XXXX-XXXXX-XXXXX-XXXXX-XXXXX. Surrounding spaces are ignored and lower-case letters become capitals. - Click Activate (or press Return). You need an internet connection at that moment.
The sheet closes and the row turns green, for example Licence active — 1 seat(s) of 2: one seat used out of the licence's two. From then on, ScreenConf works offline.
A key covers the number of Macs stated in the shop: 2 Macs as of October 2026. The app has no button to free a seat; to move the licence to another Mac, write to us.
If the key is refused
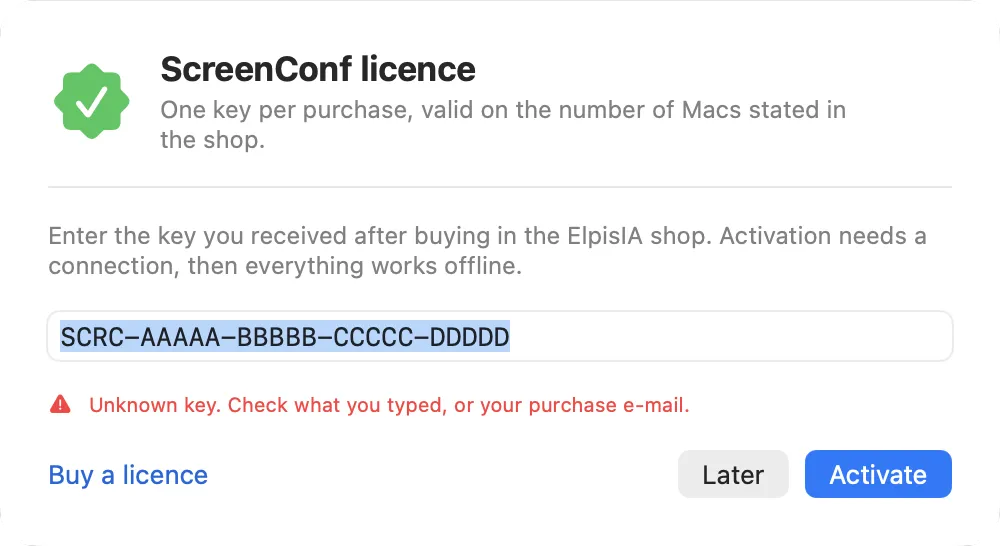
| Message | What to do |
|---|---|
| Unknown key. Check what you typed, or your purchase e-mail. | Copy the key again from the e-mail, without leaving any part out. If it is correct, try again later: an unreadable reply from the shop gives this message too. |
| All seats of this licence are already in use. | The key is already active on the number of Macs it allows: write to us. |
| This key is not a ScreenConf key. | It is the key of another ElpisIA app: use the ScreenConf one. |
| This Mac is not registered for this licence: activate it first. | Enter the key again and click Activate. |
| This licence has been deactivated. or This licence has expired. | Write to us. |
| A macOS message about the connection | Check your internet connection, then try again. |
When the trial ends
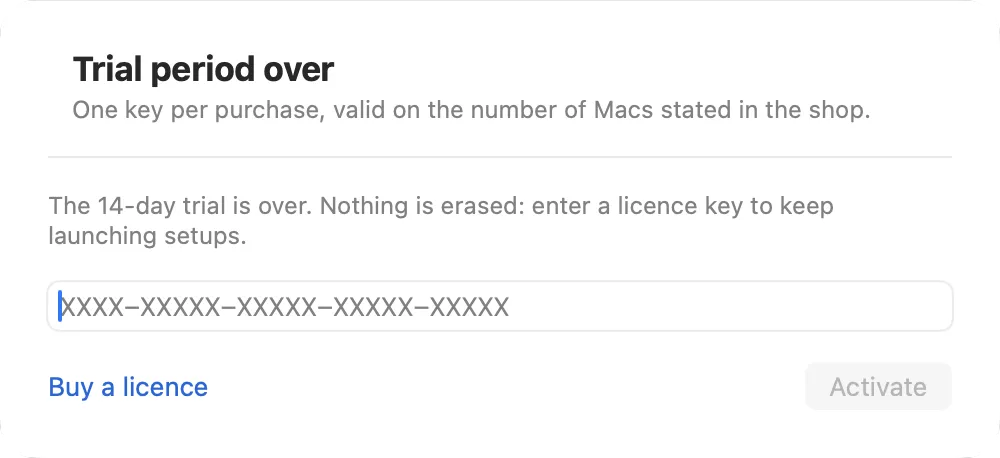
Without a licence, the row turns red, Trial period over, and the licence sheet opens and cannot be closed. Launch setup and Launch Quick Setup no longer do anything, in the window or in the menu bar.
Nothing is erased: your Quick Setup and your settings are waiting for you. Enter a key to carry on.
Once the licence is active, ScreenConf checks it again from time to time in the background, at most once a day, without asking you anything. A network outage changes nothing. Only a clear refusal from the shop (a licence deactivated, expired or unknown, for example) removes the licence from this Mac, with the reason shown.
Error messages and fixes
When a launch fails, the pill turns red, Error, and a Launch failed card tells you what happened. You can launch again straight away.
The technical detail
For an unexpected error, the card adds a line in small print, Technical detail: followed by AppleScript's text and its number in brackets. You can select the message and the detail with the mouse: copy them into your support request.
Messages and their fixes
| Message (beginning) | What to do |
|---|---|
| Source “…” not found — connect your iPad over USB | Plug the iPad in again, unlock it, click the source's ↻, then launch again. |
| No screen source in QuickTime — connect your iPad or iPhone over USB | Same thing: QuickTime sees no iPad or iPhone. |
| Choose a destination: a display or a desktop | Pick a line in the Destination menu. |
| macOS does not let ScreenConf control QuickTime. Allow it in System Settings › Privacy & Security › Automation. | See Granting the permissions. |
| macOS does not let ScreenConf control QuickTime's interface… | Turn ScreenConf on in System Settings › Privacy & Security › Accessibility, then launch again. |
| QuickTime Player is not responding. Quit it, then launch again. | Quit QuickTime (force quit it if needed), then launch again. |
| QuickTime took too long to answer… / QuickTime did not open a recording window in time… | Quit QuickTime, set the speed to Slow, then launch again. |
| QuickTime's recording window is gone. Launch the setup again. | The window was closed during the launch: launch again. |
| Desktop's display not found | That desktop's display is no longer connected: plug it back in or choose another destination. |
| QuickTime returned an unexpected error. Quit it, then launch again. | Quit QuickTime and launch again. If the error comes back, write to us and include the technical detail. |
The most common cases
- QuickTime opens but the picture stays on the wrong display: set the speed to Slow, then launch again.
- The iPad does not show up among the sources: cable, iPad unlocked, this computer trusted, then ↻.
- Launch setup is greyed out: look at the Destination menu, the status pill and the licence row. No destination chosen (Select…), a detection in progress, a display already Running or an expired trial grey the button out.
- After an update of ScreenConf or macOS: macOS may ask for Accessibility again; follow the orange card.
ScreenConf drives QuickTime Player's interface. A macOS update that changes this interface may get in the way of selecting the source or going full screen; if so, write to us and give your macOS version.
Your data and privacy
- What ScreenConf keeps on your Mac, in its preferences: the Quick Setup, the launch speed, the last list of sources, your licence key and two dates: the start of the trial and the last licence check. The macOS keychain holds the licence token and, as a second copy, the trial start date.
- What goes over the network: the licence only. On activation, then at most once a day to check it again, ScreenConf sends the ElpisIA shop your key and a fingerprint of the Mac: a hashed hardware identifier that contains neither your name nor your e-mail address. Nothing else: no statistics, no advertising, no account.
- The iPad's picture is shown by QuickTime Player. ScreenConf does not see it, record it or send it anywhere.
To uninstall ScreenConf, quit it, then move it to the Bin from the Applications folder. Reinstalling the app does not restart the trial.
A question about ScreenConf? See the FAQ or write to us with the form below.