
This tutorial takes you through Unformat setting by setting: automatic clipboard cleaning, the uppercase and lowercase modes, excluded apps, and copying the text in an area of the screen with ⌃⌥C, along with its history. Each chapter tells you where to click, with screenshots of the app.
- Mac, macOS 26 or later
- 17 chapters
- Everything happens on your Mac
- Unformat 1.1, October 2026
The screenshots show fictitious data: a history and a remote desktop window made up for the example (Lumière Studio Ltd, case CL-2026-0412), and demo statistics.
Contents (17 chapters)
Before you start
Unformat strips the formatting from whatever you copy: bold, colours, fonts and sizes disappear, and only plain text lands where you paste. It lives in the menu bar and does its work the moment you copy.
What you need
- A Mac running macOS 26 or later.
- Unformat, free on the Mac App Store. There's no account to create and no in-app purchase.
Unformat never connects to the Internet: what you copy never leaves your Mac, and the text recognition behind ⌃⌥C happens on the Mac too.
The green dot in the menu bar
Once open, Unformat sits in the menu bar, at the top right of the screen, as a small dot:
- green: cleaning is on, and every copy is cleaned;
- red: cleaning is off, and copies keep their formatting.
Unformat has no Dock icon (see Startup and Dock to add one). Hover over the dot: the tooltip reads “Unformat — Active” or “Unformat — Inactive”.
Unformat opens in French the first time, whatever your Mac's language. To switch to English, Spanish or German, choose Preferences… in its menu, then the Interface tab and the Language menu; until you switch, these read “Paramètres…”, “Interface” and “Langue” (see Appearance and language).
Three steps
- Copy as usual (⌘C), from a web page, a word processor or an email.
- Unformat spots the copy within a second and replaces it with plain text.
- Paste (⌘V): only the text arrives, without its original styling.
The Unformat menu
Click the dot in the menu bar to open the Unformat menu. Everything you need day to day is there.
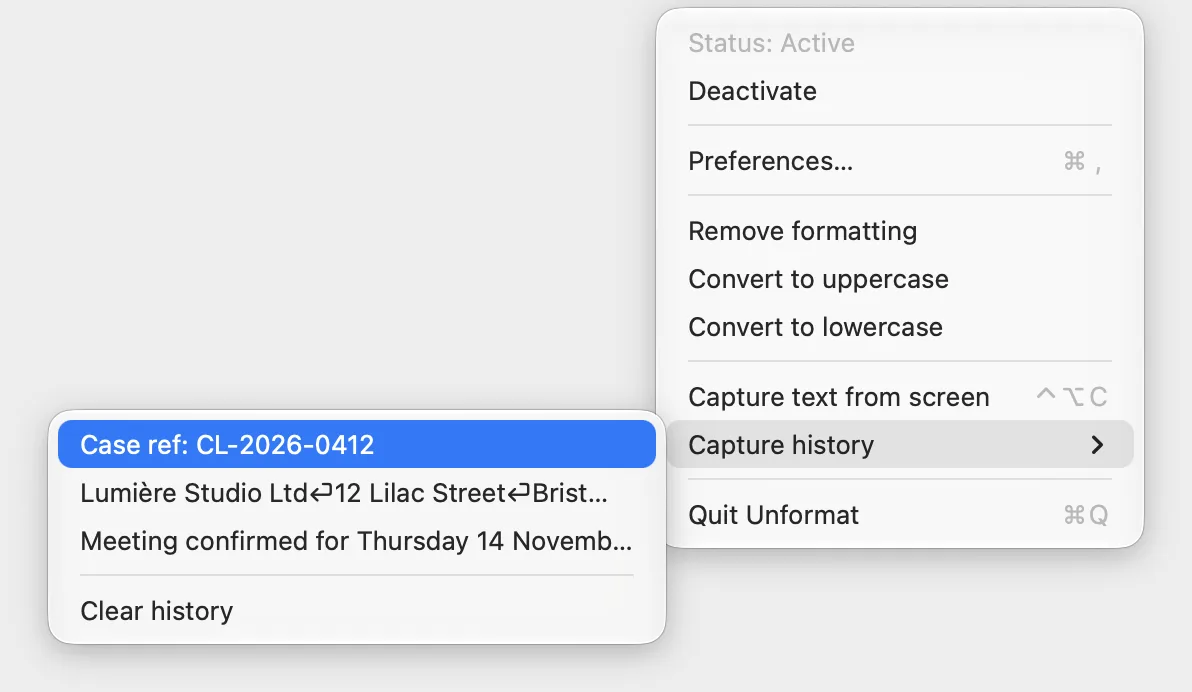
| Item | What it does |
|---|---|
| Status: Active or Status: Inactive | Shows whether cleaning is on (a greyed-out line you can't click). |
| Deactivate or Activate | Turns cleaning off or back on; the dot turns red or green. Same as ⌥⌘V. |
| Preferences… ⌘, | Opens the Preferences window (see The Preferences window). |
| Remove formatting, Convert to uppercase, Convert to lowercase | The transformation modes, ticked or not (see Uppercase, lowercase and spaces). |
| Capture text from screen ⌃⌥C | Copies the text in an area of the screen that you frame (see Capturing text from the screen). |
| Capture history | The last ten texts copied or captured (see The capture history). |
| Quit Unformat ⌘Q | Quits Unformat: nothing is cleaned until you open it again. |
To reopen Unformat after quitting it, use the Applications folder or Spotlight (⌘Space, then type “Unformat”). To have it open automatically every time you log in, see Startup and Dock.
Automatic cleaning
While the dot is green, Unformat checks the clipboard at regular intervals (every second by default). When a new copy carries formatting, it replaces it with plain text.
What gets cleaned
- text copied with RTF formatting: word processors, Notes, Mail, TextEdit…;
- text copied with HTML formatting: web pages, emails, web apps.
Both formats are cleaned by default; each can be switched off on the Monitoring tab (see Formats and spaces). Text copied without formatting is left as it is, unless a transformation mode is ticked or you have turned on Trim spaces and line breaks at the start and end. A copy that mixes formatted text and images keeps only the text.
What is never touched
- files and folders copied in Finder, and links;
- an image copied on its own (with no text);
- passwords copied from a password manager that marks them as confidential;
- anything you copy from an excluded app (see Excluding apps).
Confirmation
Each time a copy is cleaned, Unformat lets you know: a green Copied badge in the middle of the screen for a second and a half, a discreet sound and a Clipboard cleaned notification, which has a sound of its own. All three can be adjusted or turned off on the Notifications tab (see Notifications, badge and sound). The Total cleaned counter goes up by one.
Anything you copy while cleaning is off isn't cleaned after the fact when you turn it back on: copy it again.
Uppercase, lowercase and spaces
Three modes, ticked in the Unformat menu, transform the copied text further. They only work while cleaning is on.
- Convert to uppercase: all copied text becomes uppercase;
- Convert to lowercase: all copied text becomes lowercase;
- Remove formatting: removes formatting even when a case mode is ticked (see below).
Uppercase and lowercase are mutually exclusive: ticking one unticks the other. They apply to every text copy, with or without formatting. To go back to normal, untick the mode.
What is “Remove formatting” for?
- With no case mode, formatting is always removed: ticking it changes nothing.
- With a case mode, any text the conversion changes becomes plain text anyway. Only text already in the right case (already all uppercase, say) would keep its formatting: the tick removes that too.
Trimming extra spaces
In Preferences…, on the Monitoring tab, turn on Trim spaces and line breaks at the start and end: spaces, tabs and line breaks at the start and end of the copied text are removed. Handy for a number or a word copied along with the space after it. The text in between is left unchanged.
Back to contents⌥⌘V: turning cleaning off and on
To keep a copy's formatting just this once, turn cleaning off while you copy and paste, then turn it back on.
- Press ⌥⌘V, from any app: the dot turns red.
- Copy and paste your text: it keeps its formatting.
- Press ⌥⌘V again: the dot turns green again.
⌥⌘V doesn't paste anything: it only toggles cleaning. The Deactivate / Activate menu item does the same.
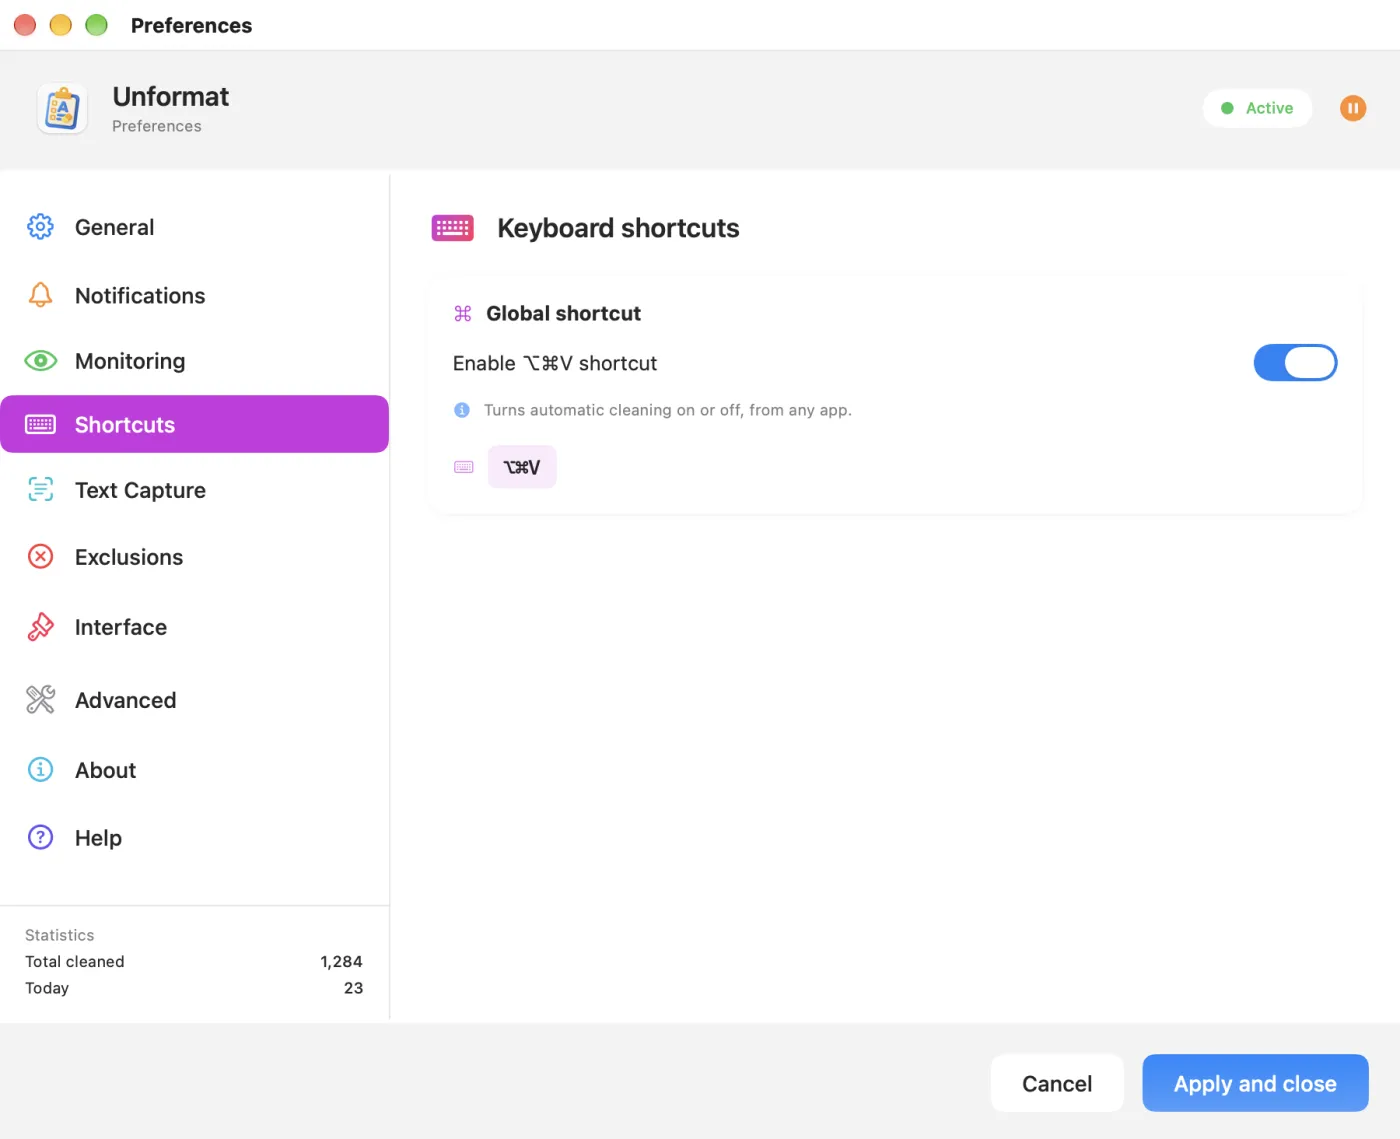
As long as this shortcut is enabled in Unformat, even with cleaning off, it takes over ⌥⌘V from other apps, such as “Move Item Here” in Finder. If you use that, turn off Unformat's shortcut: Preferences…, Shortcuts tab, Enable ⌥⌘V shortcut switch. The change takes effect immediately.
Excluding apps
Anything you copy from an excluded app keeps its formatting, without your having to turn cleaning off. Useful for a code editor or page layout software.
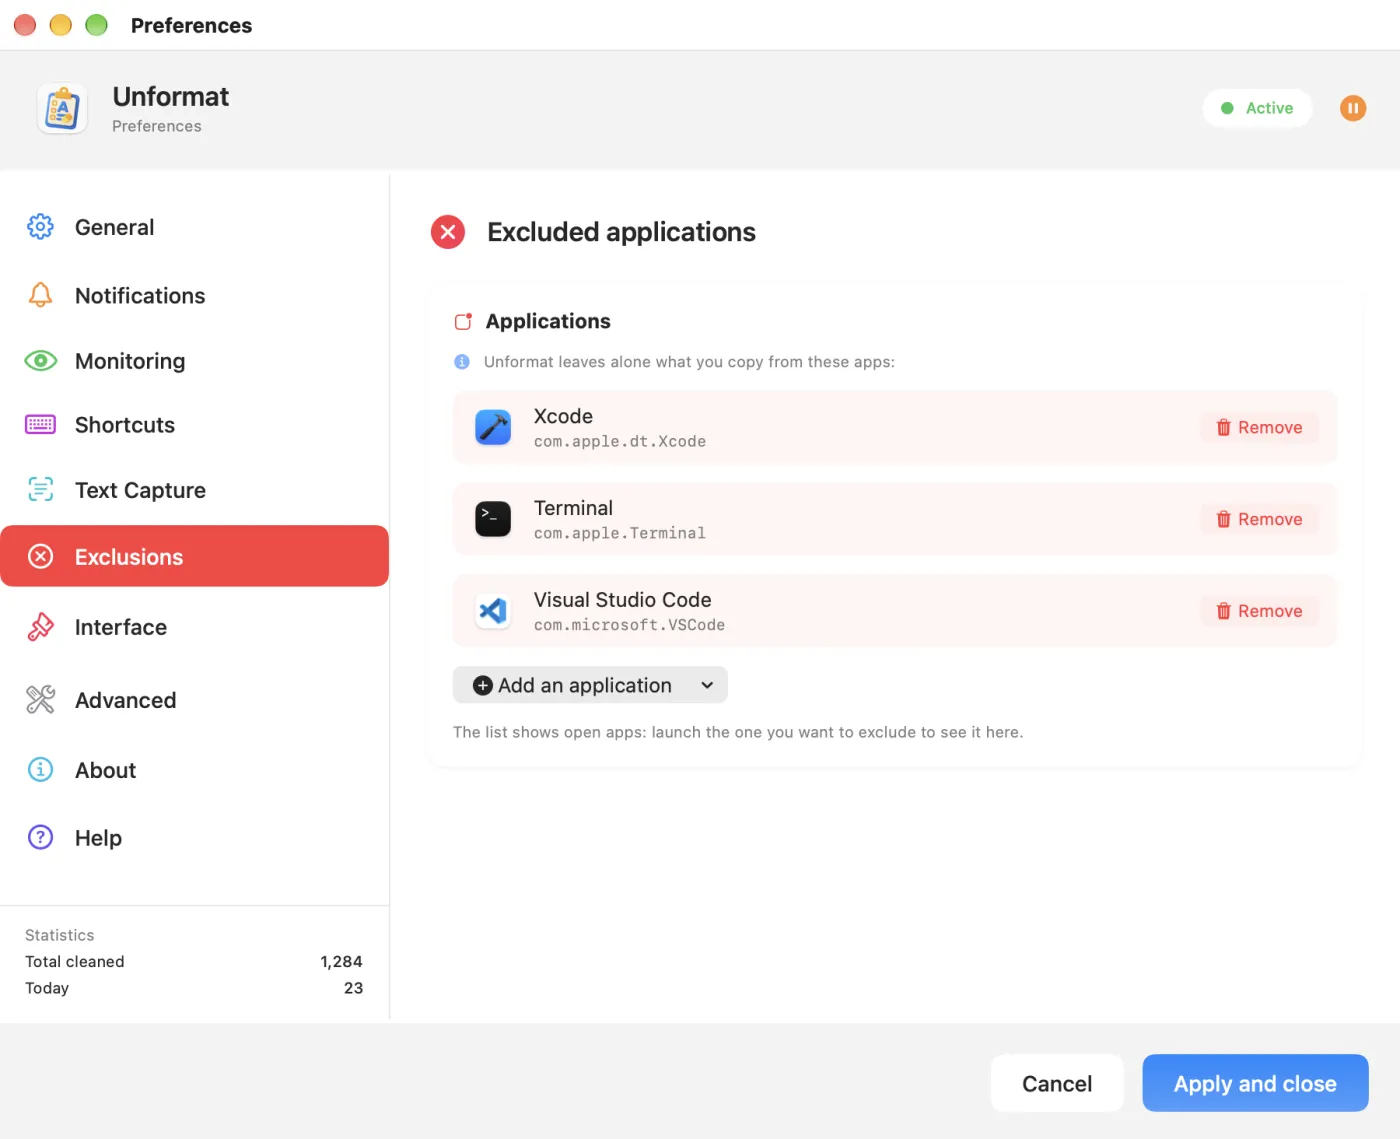
- First open the app you want to exclude: the list only offers open apps that have an icon in the Dock (a menu bar app can't be excluded).
- In Preferences…, on the Exclusions tab, click Add an application.
- Choose the app from the menu: it's added to the list, with its icon, name and identifier.
A row's Remove button takes it off the list. Three apps are excluded by default: Xcode, Terminal and Visual Studio Code; remove them if you want their copies cleaned. Exclusions take effect immediately, with no button to confirm.
Unformat checks which app is in front at the moment it spots the copy. Stay in the excluded app for a second after copying.
Capturing text from the screen (⌃⌥C)
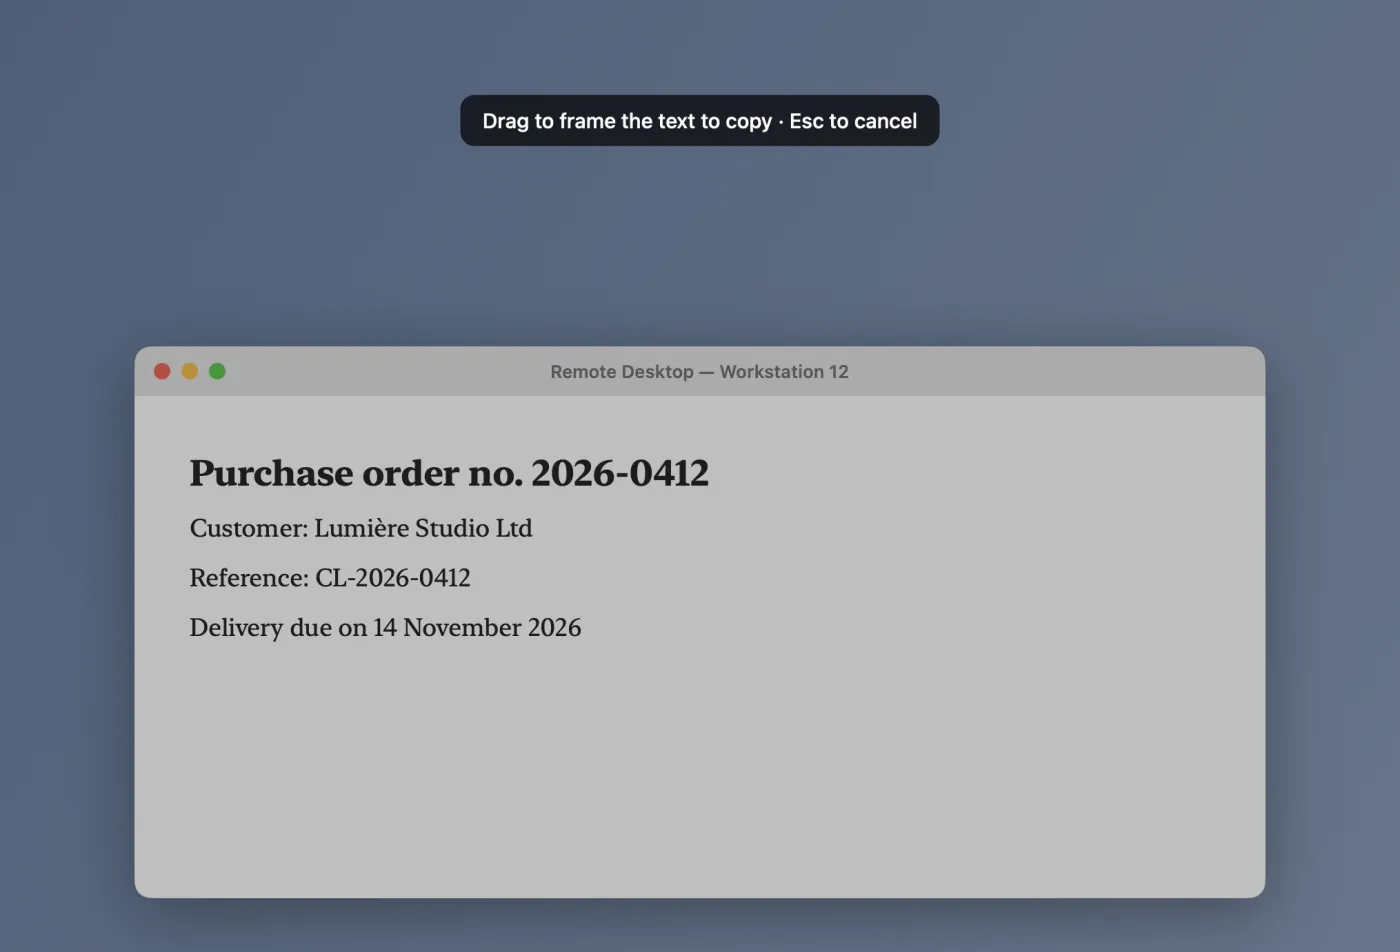
Some text can't be selected: a remote desktop session, an image, a video, a dialogue box. With ⌃⌥C, you frame the area and Unformat recognises the text in it, on the Mac, then puts it on the clipboard.
- Press ⌃⌥C, or choose Capture text from screen from the Unformat menu.
- The screen darkens and the pointer turns into a crosshair. The prompt Drag to frame the text to copy · Esc to cancel appears.
- Drag to draw a rectangle around the text, then let go.
- The recognised text is now on the clipboard: paste it wherever you like. If notifications are on, a Copied notification shows how it begins.
- A single click without dragging is ignored: the overlay stays put, so draw a rectangle.
- Esc or a right-click cancels without copying anything.
- The overlay covers every connected display: you can frame text on any of them.
- If nothing can be read in the area, nothing is copied (with notifications on, a No text recognised notification tells you so): try again with a wider frame, or with larger text.
The first time: macOS permission
To read the area you draw, Unformat needs macOS's Screen Recording permission. It's the only privacy permission it asks for (apart from notifications, which are optional), and only for ⌃⌥C.
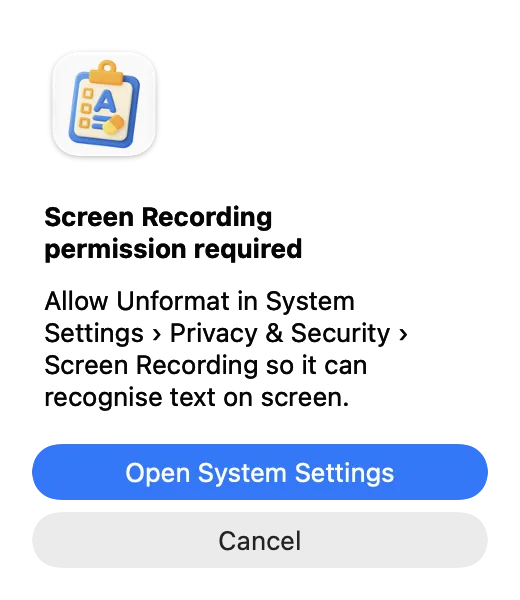
- The first time you press ⌃⌥C, macOS shows its own request, and Unformat shows the alert Screen Recording permission required.
- Click Open System Settings.
- In System Settings › Privacy & Security, open the screen recording section (on macOS 27: “Screen & System Audio Recording”) and turn Unformat on.
- macOS often offers to quit and reopen Unformat: accept. If it doesn't and ⌃⌥C still won't work, quit Unformat and reopen it yourself.
Right after installation, or after a macOS update, the very first recognition can take about a minute while macOS prepares its reading models. Unformat starts this preparation as soon as it opens; after that, a capture takes about a second.
Recognition languages and correction
The Text Capture tab in Preferences sets up text reading and the shortcut, and shows the permission status.
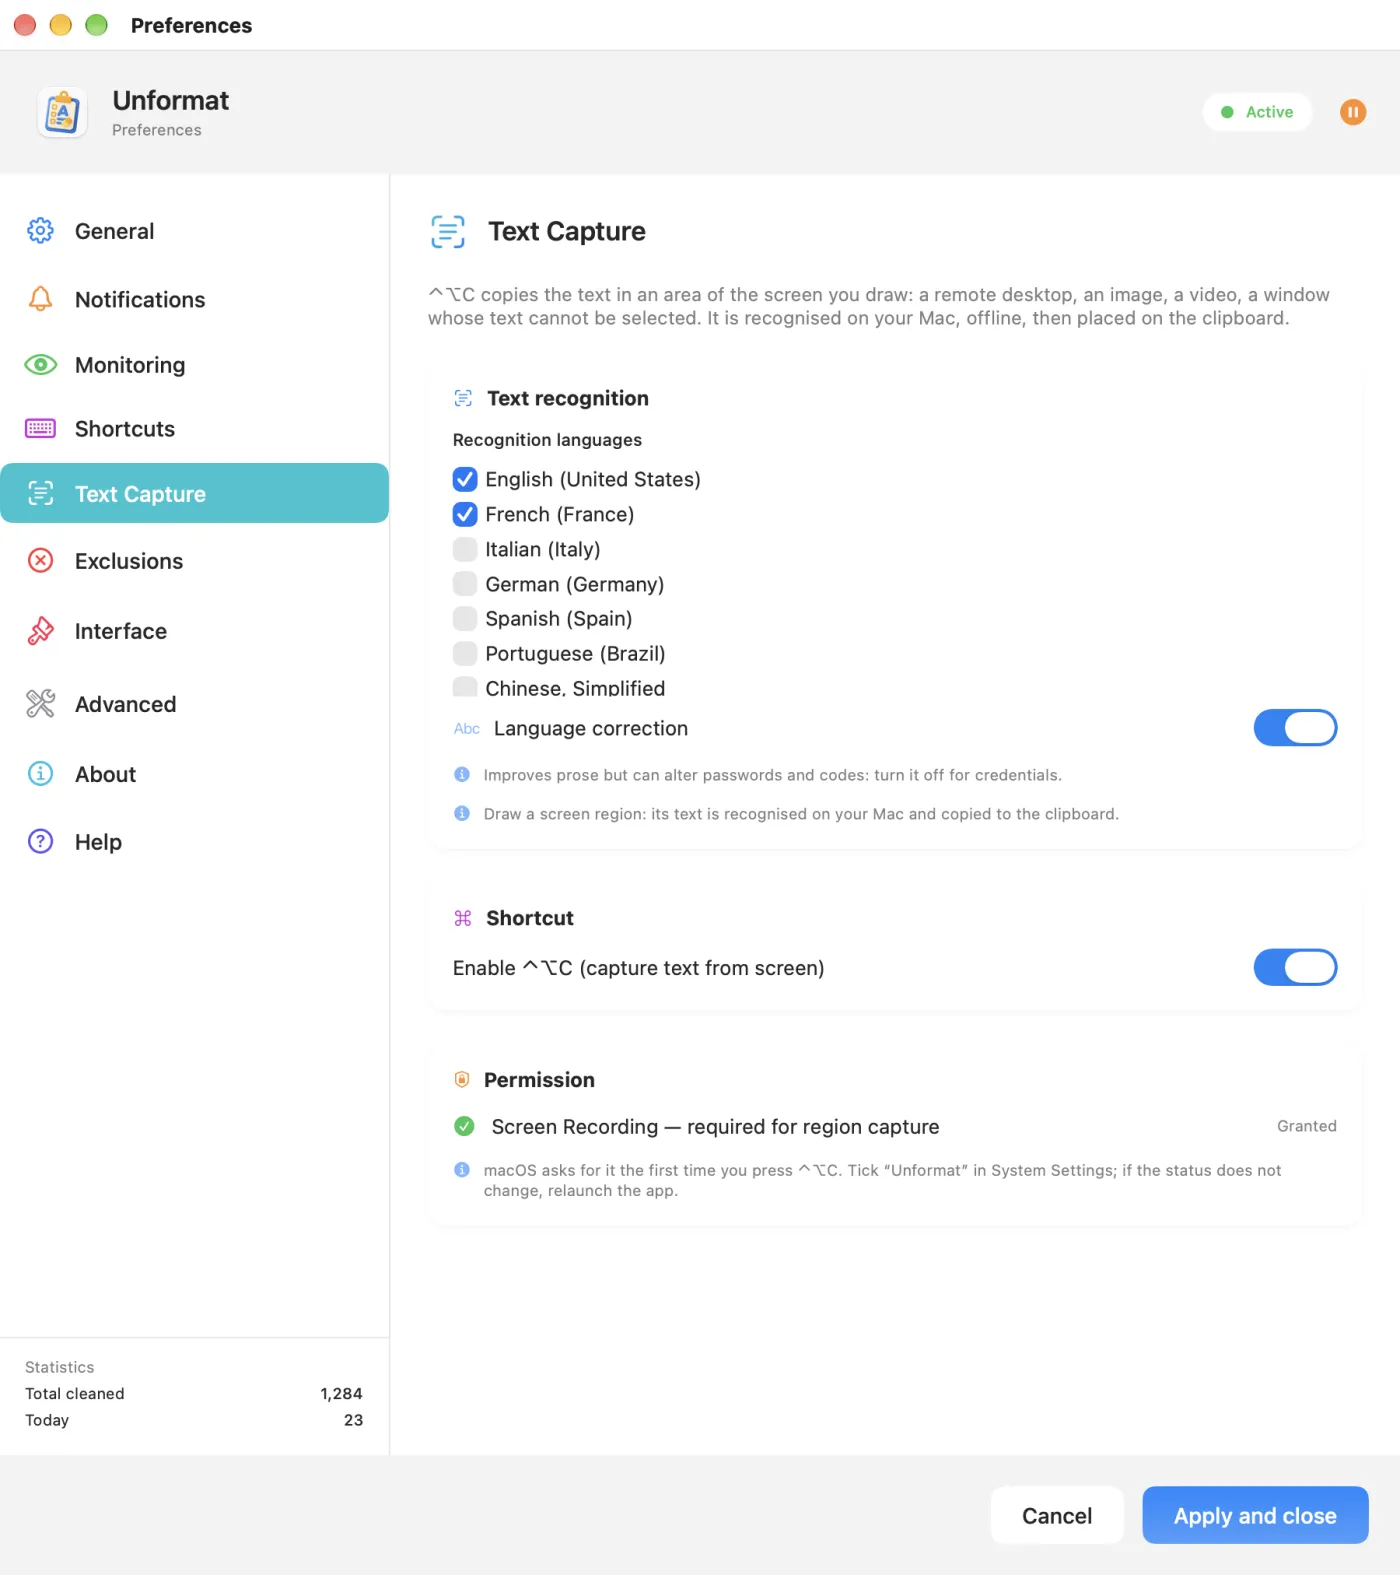
Text recognition
- Recognition languages: tick the languages of the text you capture. Ticked languages move to the top of the list; French and English are ticked by default. At least one language always stays ticked.
- Language correction (on by default): improves the reading of ordinary text, but can change a password, a code or a reference. Turn it off before capturing credentials.
Shortcut and permission
- Enable ⌃⌥C (capture text from screen): turn this off if ⌃⌥C is already used in another app. The menu item stays available.
- Screen Recording — required for region capture: the status, Granted or Denied, updates every second. While permission is denied, the Open System Settings button takes you to the right page.
Reading follows the lines from top to bottom. In text laid out in two columns, the columns get mixed up: frame one column at a time.
The capture history
The Capture history submenu keeps the last ten texts that went through the clipboard: the ones you capture with ⌃⌥C, but also the ones you copy normally, even with cleaning off (including the name of a file copied in Finder).
- The most recent is at the top. Each line shows the first 40 characters, with “⏎” standing for a line break. Hover over a line to read the full text.
- Click a line to put that text back on the clipboard, then paste it wherever you like.
- Clear history, at the bottom of the submenu, empties it. When it's empty, it shows Nothing captured yet.
The history is kept in memory, never on disk: it disappears when you quit Unformat. Passwords that a password manager marks as confidential never go into it.
The Preferences window, startup and Dock
Preferences… in the menu (or ⌘, while the menu is open) opens the Preferences window. The tabs are in the left-hand column, with the statistics at the bottom of that column.
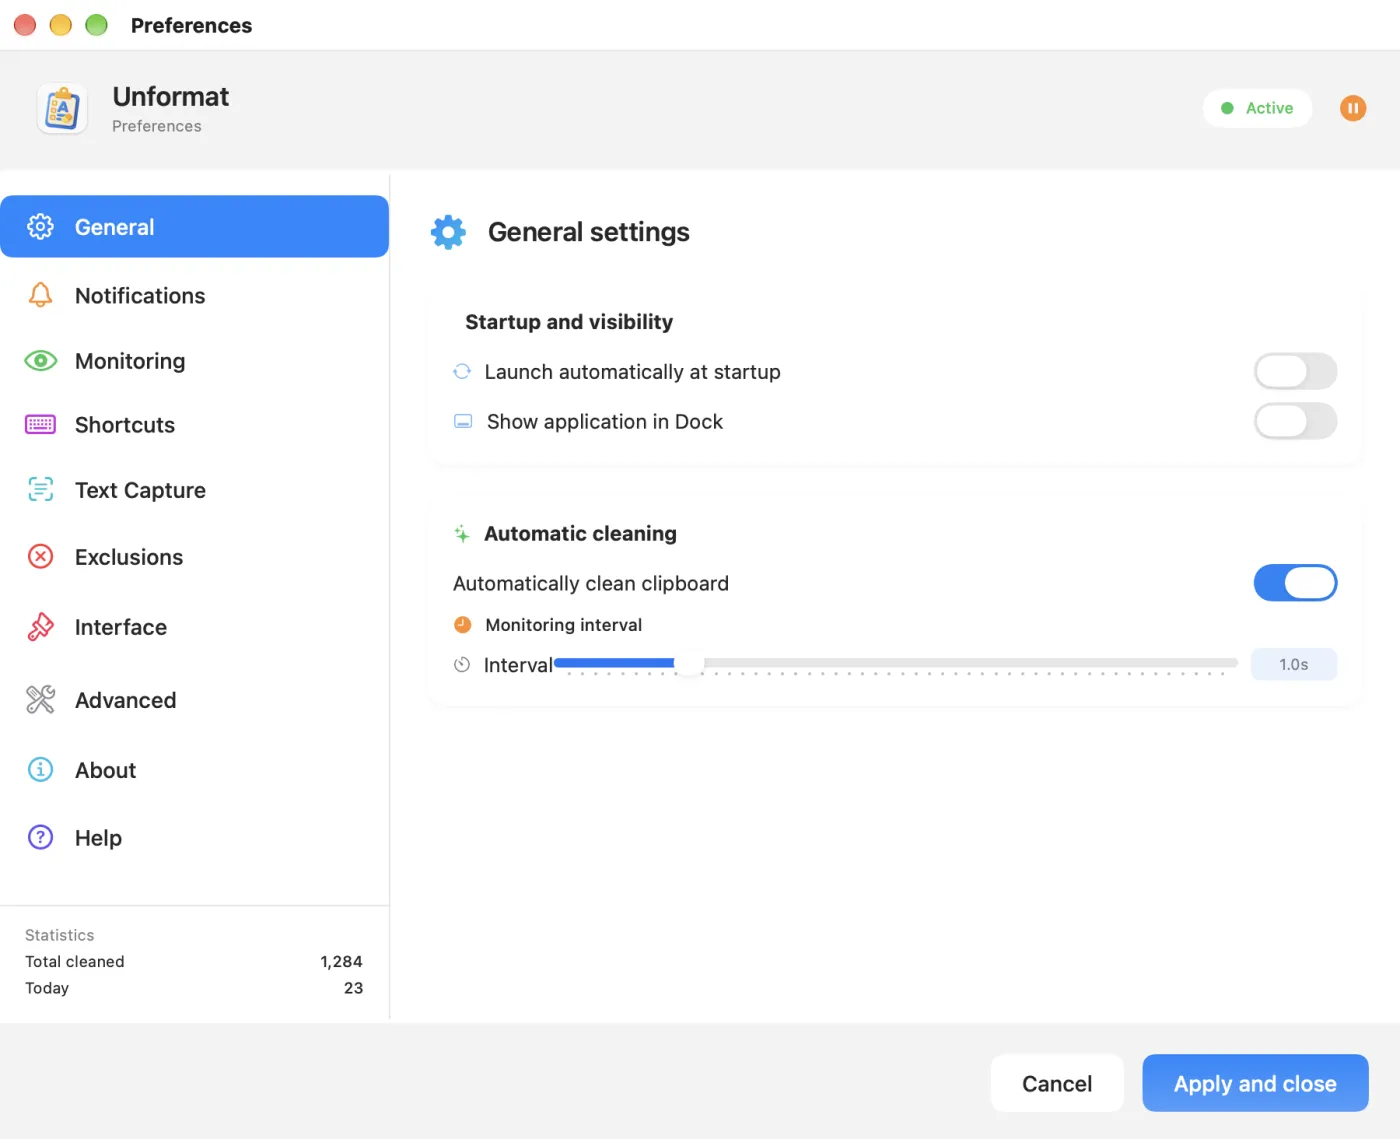
At the top right, the Active or Inactive badge shows whether cleaning is on; the round button next to it turns cleaning off (pause) or back on (play), just like ⌥⌘V. If you use this button, close the window afterwards with Cancel or its red button: Apply and close would put cleaning back the way it was when you opened the window (it applies the value set on the General tab).
The General tab
- Launch automatically at startup: Unformat opens every time you log in. macOS then lists it among the items that open at login, in its settings.
- Show application in Dock: adds an Unformat icon to the Dock, as well as the dot in the menu bar.
- Automatically clean clipboard: the main switch, the same as Activate / Deactivate in the menu.
- Monitoring interval: how long Unformat waits between two checks of the clipboard, from 0.1 to 5 seconds (1 second by default). The shorter it is, the faster cleaning follows your copy; 1 second is right almost every time.
Settings on the General tab only take effect once you click Apply and close. Cancel, or closing the window with its red button, discards them. The other tabs, on the other hand, apply as soon as you click.
Notifications, badge and sound
The Notifications tab sets how Unformat tells you about each cleaned copy: a macOS notification, an on-screen badge, a sound. Everything is on to begin with.
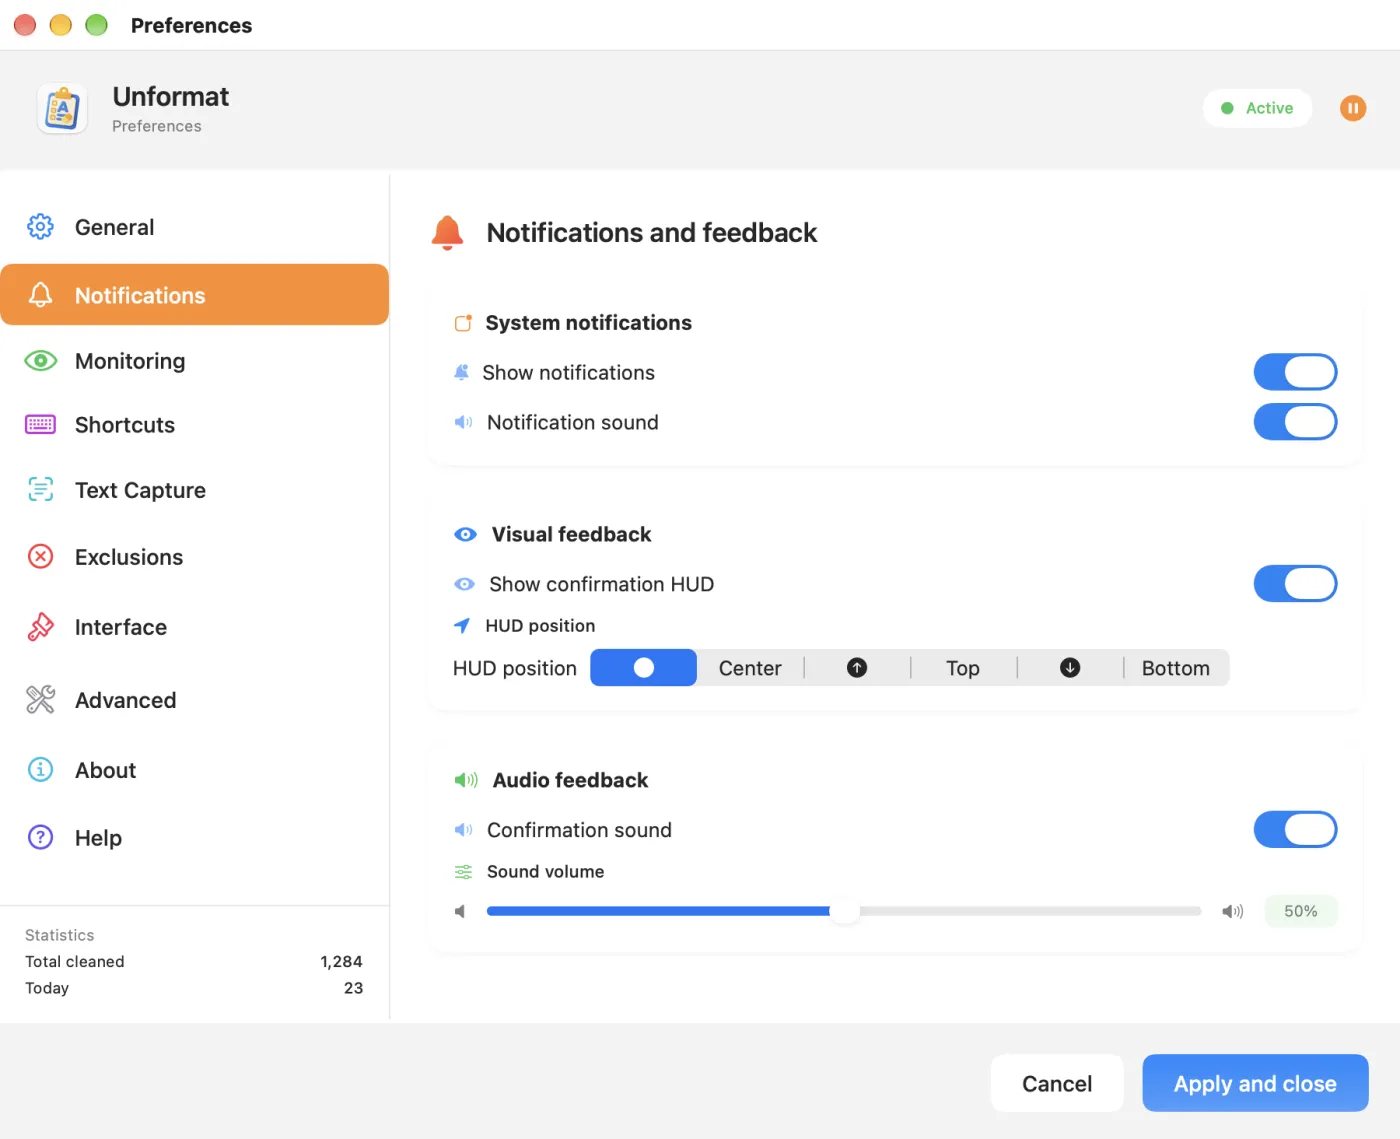
- System notifications: Show notifications (“Clipboard cleaned” in Notification Centre, plus the ⌃⌥C messages) and Notification sound (the sound of the “Clipboard cleaned” notification). The first time a copy is cleaned, macOS asks whether Unformat may show notifications.
- Visual feedback: Show confirmation HUD, the green Copied badge shown for a second and a half; HUD position: Center, Top or Bottom of the screen.
- Audio feedback: Confirmation sound, a discreet “tink”, and its Sound volume (50% to start with).
For silent cleaning, turn off Show notifications, Show confirmation HUD and Confirmation sound. If notifications don't arrive even though they're on here, check System Settings › Notifications › Unformat.
Back to contentsFormats and spaces
The Monitoring tab sets what Unformat cleans.
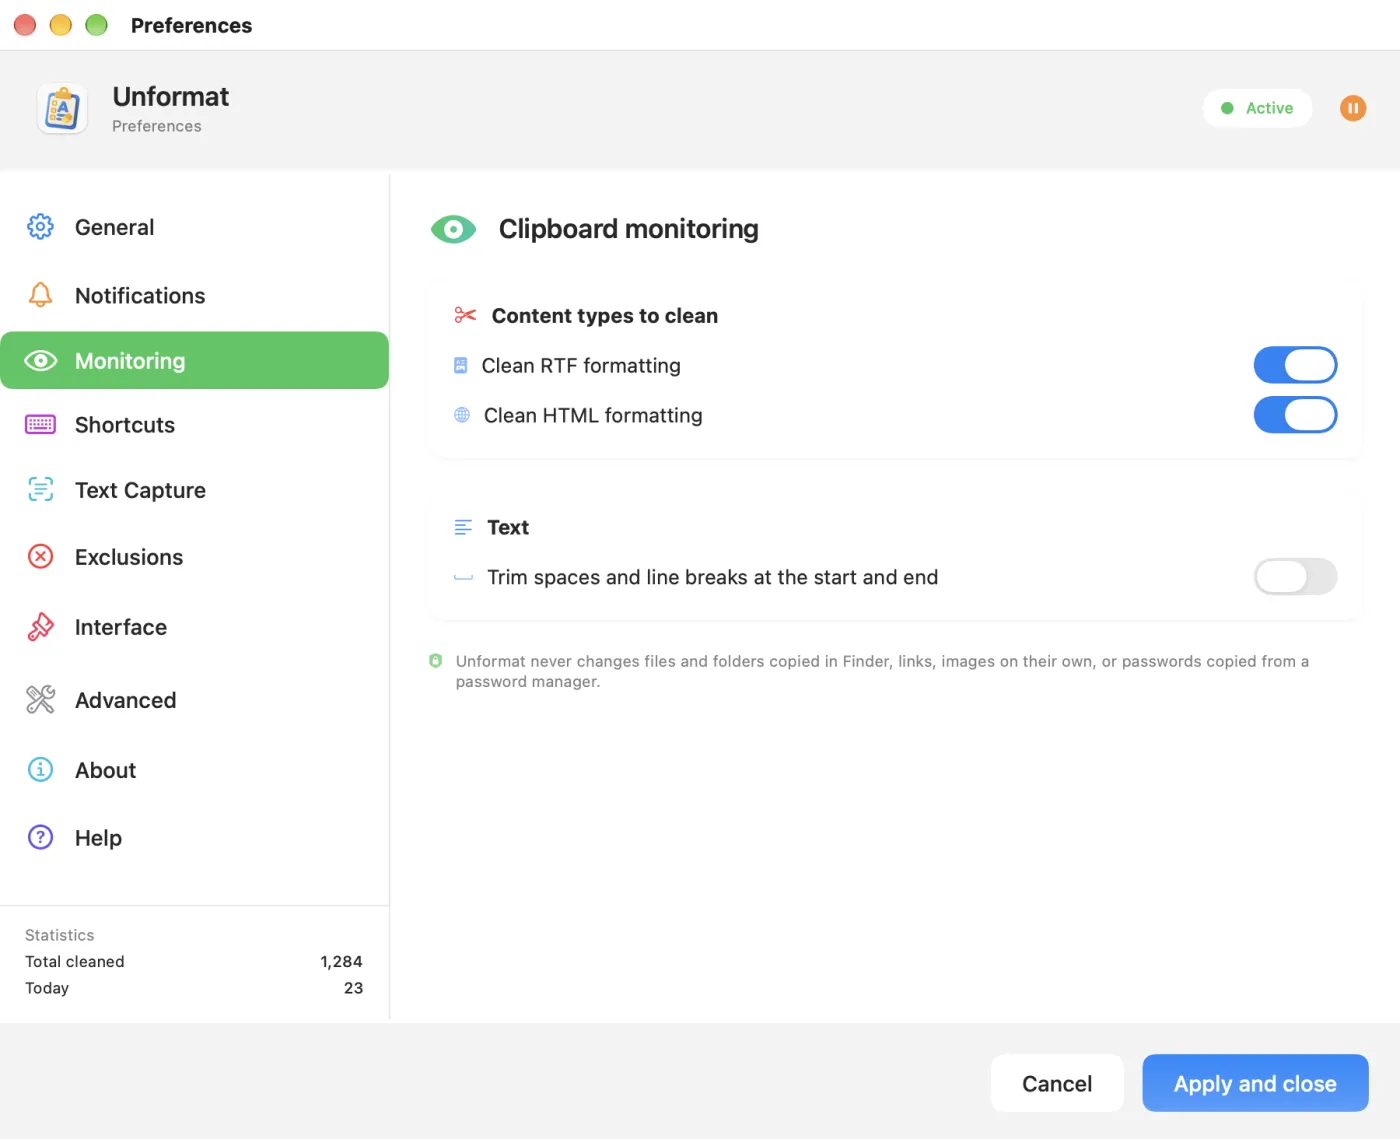
- Content types to clean: Clean RTF formatting and Clean HTML formatting, both on. A copy is cleaned as soon as it carries one of the formats switched on, and many apps copy both at once: to keep the formatting from one particular app, exclude that app instead (see Excluding apps).
- Text: Trim spaces and line breaks at the start and end (see Uppercase, lowercase and spaces).
The note at the bottom reminds you what Unformat never changes: files and folders copied in Finder, links, images on their own and passwords from a password manager.
Back to contentsAppearance and language
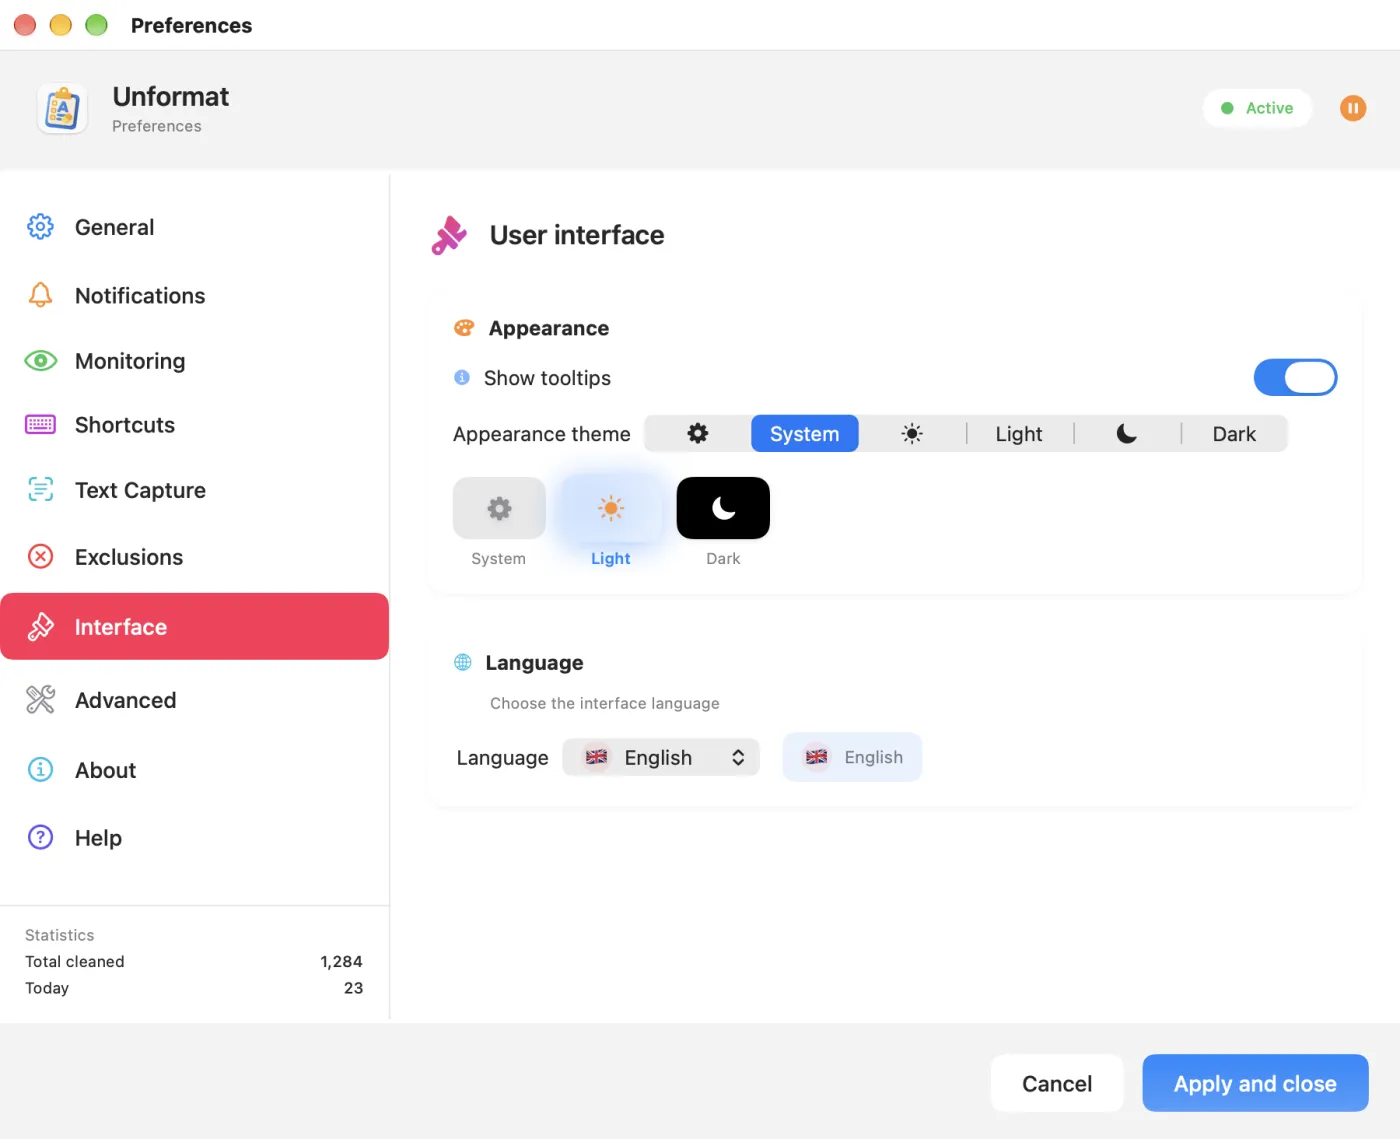
- Show tooltips: the tooltip on the menu bar dot.
- Appearance theme: System, Light or Dark, for the Preferences window.
- Language: French (Français), English, Spanish (Español) or German (Deutsch). The change is immediate, menu included, and doesn't depend on your Mac's language.
Statistics, About and Help
Statistics
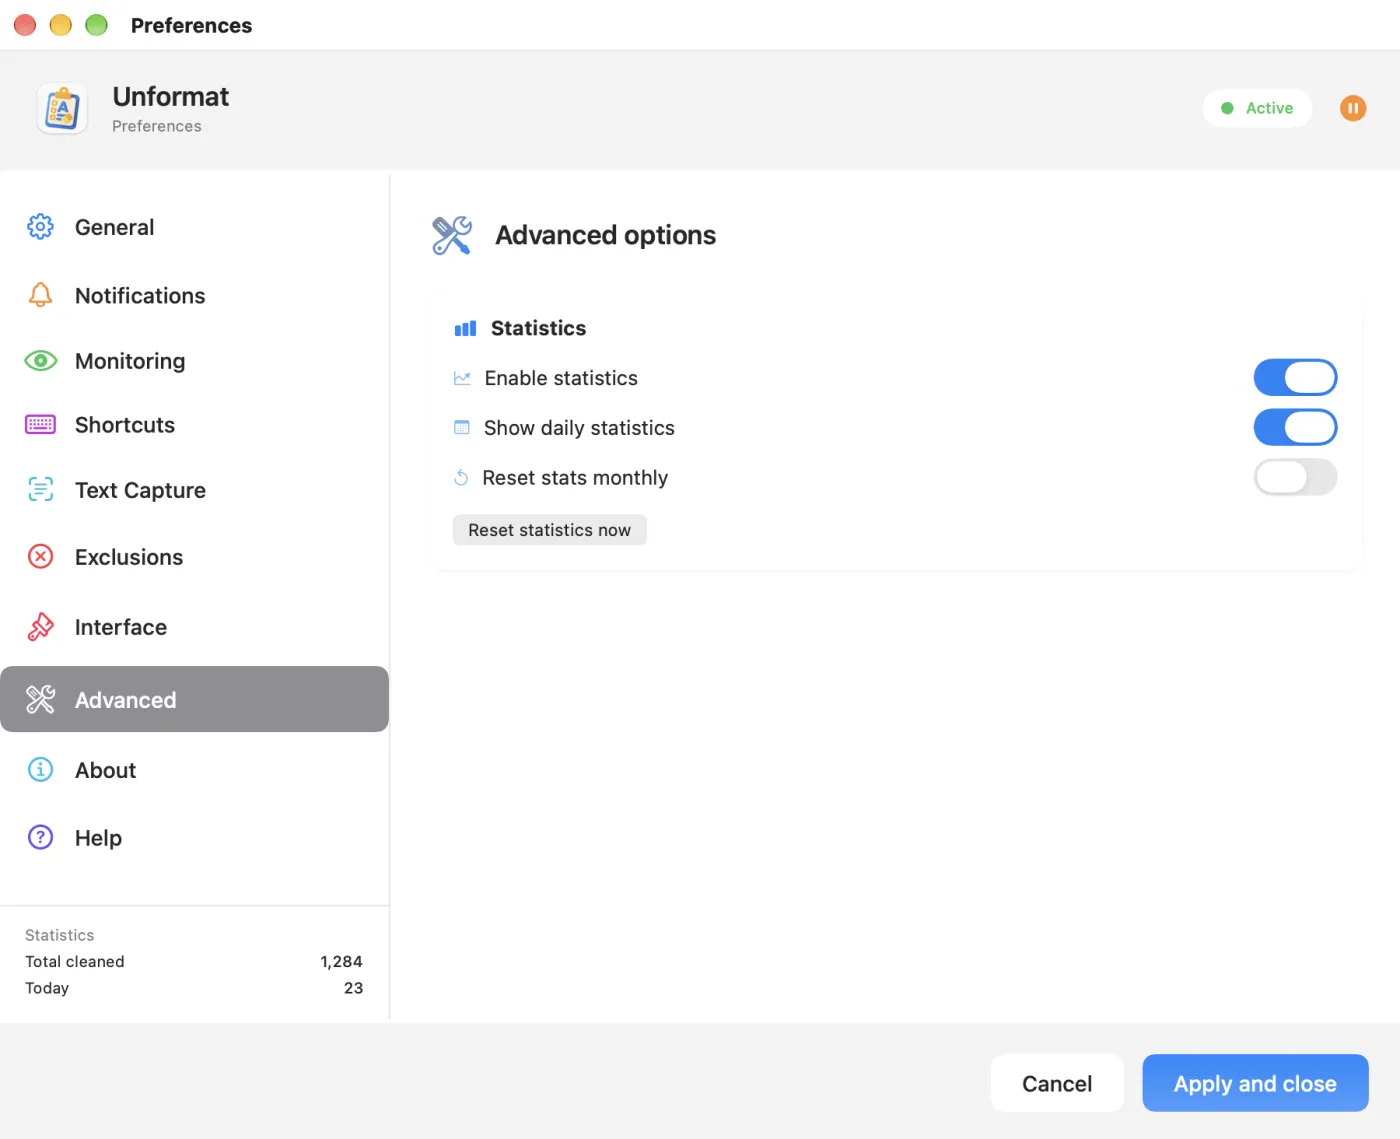
At the bottom of the left-hand column, Total cleaned counts cleaned copies and Today counts the day's; this second counter starts again from zero every day. The Advanced tab controls them:
- Enable statistics: shows or hides the counters (when hidden, they keep counting);
- Show daily statistics: the Today line;
- Reset stats monthly: the total goes back to zero at the start of each month;
- Reset statistics now: resets both counters straight away, without asking for confirmation.
About and Help
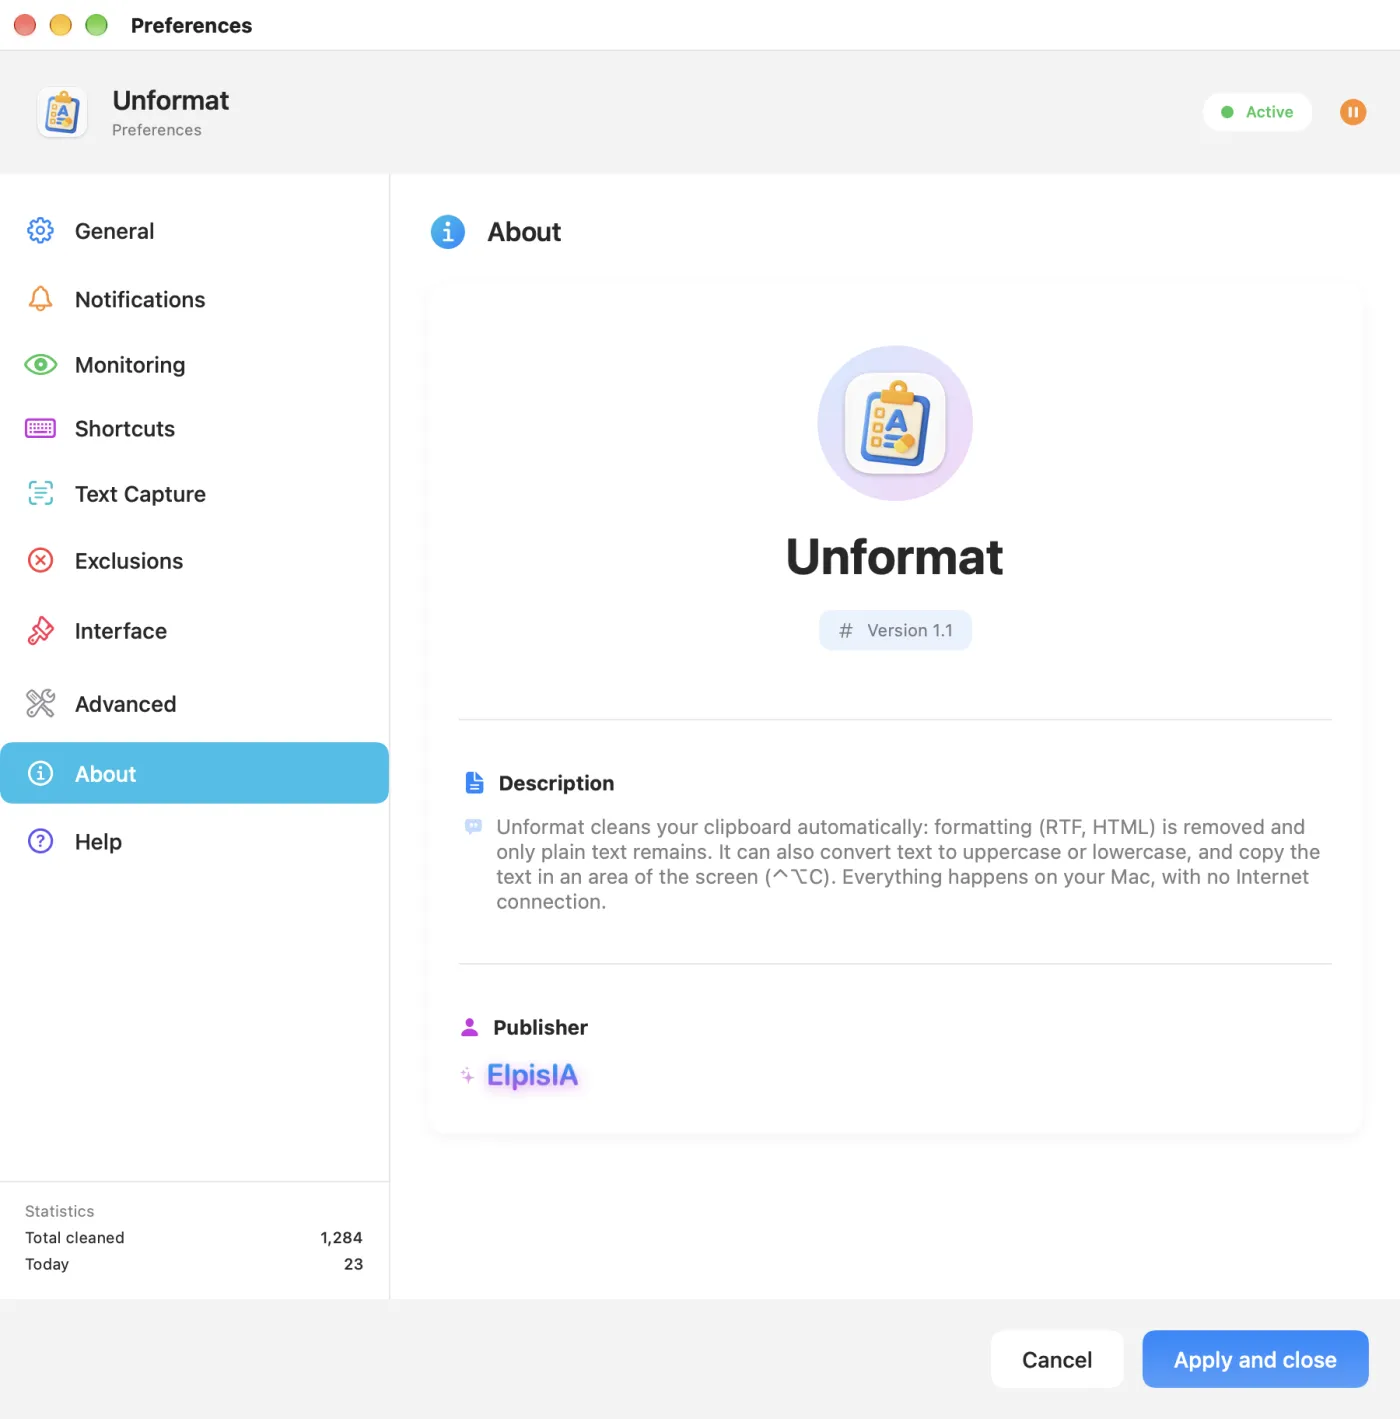
The About tab shows Unformat's version (handy if you write to us) and its publisher, ElpisIA. The Help tab sums up how it works, the modes, the shortcuts, text capture, the settings and troubleshooting.
Your data and permissions
- No Internet connection. ElpisIA never receives anything you copy or capture.
- What is stored: your settings and the counters, in the app's preferences, on the Mac. The capture history stays in memory and disappears when you quit.
- Text recognition: done by macOS, on the Mac, and only in the area you draw.
- Permissions: Screen Recording, for ⌃⌥C only, and notifications, which are optional. Clipboard cleaning needs no permission at all. You can withdraw both in System Settings (Privacy & Security, Notifications).
Troubleshooting
A copy keeps its formatting
- Is the dot green? The menu should show Status: Active.
- Is the app you're copying from on the Exclusions tab? Xcode, Terminal and Visual Studio Code are there by default.
- On the Monitoring tab, is the format switched on (Clean RTF formatting, Clean HTML formatting)?
- Did you paste less than a second after copying? With the default interval, give Unformat a second, or shorten the Monitoring interval.
- Is Unformat open? If you quit it, reopen it from the Applications folder.
⌥⌘V no longer does what it used to in another app
Unformat's shortcut is taking it over: turn it off on the Shortcuts tab (see ⌥⌘V).
⌃⌥C does nothing, or the permission alert keeps coming back
- Check the Text Capture tab: the Screen Recording line should say Granted.
- If it doesn't, turn Unformat on in System Settings › Privacy & Security, in the screen recording section, then quit and reopen Unformat.
- Check that Enable ⌃⌥C (capture text from screen) is on, or use the menu item. Another app, or Unformat Pro running at the same time, may already be using ⌃⌥C.
- The very first capture after installation can take about a minute: give it time.
The captured text contains mistakes
- Tick the right language under Recognition languages.
- For a code, a reference or a password, turn off Language correction.
- Frame only one column of text at a time, and enlarge the text on screen if it's small.
Always check a captured code, number or amount before using it. Still have a question? See the FAQ or write to us using the form below.
Back to contentsWhat about Unformat Pro?
Unformat Pro is the full version of Unformat, sold by ElpisIA outside the Mac App Store, with a 14-day free trial.
It does everything Unformat does and adds: typing the clipboard where pasting is blocked (Citrix, remote desktops, locked-down websites) with ⌃⌥V, copying selected text directly with ⌃⌥C, a history that retypes the text you pick, and showing Finder's hidden files. These features need the Accessibility permission, which Mac App Store rules reserve for accessibility features.
Keep only one of the two open: together, they would clean every copy twice and their shortcuts would get in each other's way. It's all explained in the Unformat Pro tutorial.
Back to contents